Camera setting tips for creative, high quality video recordings.

An entry-to-mid-level interchangeable-lens camera with movie record located on the mode dial.
There are two ways to get a camera to record video. One is via a mode dial and the other is by pressing a dedicated Movie button (which normally carries a red dot for easy identification). A few manufacturers provide only one of these options on some models in their ranges.

This flagship-model mirrorless camera provides a mode dial setting plus a clearly identified Movie button to make it fast and easy to swap between movie and stills capture.
In cameras with only a mode dial setting, you must press the shutter release button to start and end a movie recording. Where a dedicated Movie button is provided, you should press it to initiate and stop recording.
By default, audio soundtracks are recorded while each clip is being recorded so the camera’s microphones will pick up ambient sounds in the area as well as any internal noises caused by focusing the lens or adjusting aperture settings. While the camera is recording a red ‘REC’ icon is displayed at the top of the screen to let you know recording is taking place.

The camera’s screens will show you when recording is in progress. Some or all of the following icons may be displayed before and during recording. 1: indicates recording is taking place; 2: shows the sound levels being recorded by the stereo microphones; 3: focus mode indicator; 4: lens focal length; 5: exposure level adjustments; 6: AF mode; 7: movie mode indicator; 8: elapsed recording time; 9: battery status; 10: controls lock.
Menu settings
Check the settings in your camera’s menu to make sure the movie mode is selected and you will be recording with the resolution and frame rate you want. By default, entry-level cameras usually operate in auto mode when movies are recorded, which means parameters like shutter speed, aperture and ISO are set automatically.

The Quick Menu display in the movie shooting mode shows you the most important camera settings, including exposure compensation, sound levels, focusing, white balance, wireless connection, resolution and frame rate.
Manual over-rides are available in many cameras and some also have dedicated pre-sets for recording HDR (High Dynamic Range) movies in situations where there is a wide brightness range, such as many beach and snow scenes or subjects silhouetted against a bright light source.

While the default setting is for auto exposure, a manual exposure setting below it lets you adjust the shutter speed, aperture value and ISO sensitivity when recording in dimly-lit situations. The HDR mode selection at the bottom of the screen adjusts the camera to shoot movies that will retain as much detail as possible in both bright areas and shadows.
The next step is to select the resolution and frame rate you want for your recording, bearing in mind that high resolution (4K) files contain a lot of image data so you’ll need fast memory cards with stable performance. Check your camera’s user manual for recommendations.
Choosing a frame rate faster than 25 fps will also require your camera to have a fast image processor. Higher-featured cameras provide 50 fps for Full HD (1920 x 1080 pixel) recordings and sometimes for 4K as well. The camera may become warm to the touch while you record for more than a minute or two and will shut down automatically if it gets warm enough to damage the electronics.

Typical recording sizes and frame rates for a PAL system camera capable of recording video movies.
Many cameras include HFR (High Frame Rate) modes for recording slow-motion videos, usually for motion analysis. These modes are normally restricted to 100 fps and Full HD resolution to prevent overheating. Playing back a recording made at 100 fps with the regular 25 fps playback speed slows movement down to a quarter of normal speed.

Resolution is normally reduced when the High Frame Rate Movie option is enabled to prevent the camera from overheating and allow long enough recordings for useful motion analysis.
No soundtracks are recorded with HFR movies and you may see flicker during playback when movies are recorded under fluorescent lighting. Note the Standard (IPB) tag in the frame grab on this page. It refers to the compression system used for recording movies.
Most cameras use IPB, which stores one full frame every half second of recording, along with any changes that occur in the preceding frames, using the previous key frame to guess what the missing data is. This system is great for delivering good image quality with a reduced overall file size.
Some cameras also provide the option to select All-I compression, which captures each frame as a key frame and compresses them individually. It’s a good choice if you want to grab frames from the movie afterwards but produces clips that require roughly three times more storage space than those compressed with IPB. All-I compression is often used for time-lapse photography.

The Digital zoom function ‘zooms in’ on scenes by cropping the frame.

You may find the digital zoom is only available at lower resolutions as frames must be cropped to zoom in on a subject. To avoid loss of picture quality, only the highest-resolution frames are cropped, so your movie frames will usually be smaller.
Using the digital zoom function can result in a loss of image quality so it’s not available with the highest resolution settings, nor when you’re recording time-lapse movies or with the filter effects. Nor is it supported when you’re using Movie IS, which stabilises the video by cropping the frame dynamically in response to detected camera movement. ISO sensitivity settings may also be restricted.

Most cameras give you some control over how much the frame is cropped so you can decide the degree of resolution to sacrifice in order to zoom in close to the subject.
Many cameras provide visual aids to help you make sure the exposure levels in the scene are correct and the subject is in focus. Zebra patterns are used for showing areas in which highlights are ‘blown-out’, letting you reduce the overall exposure by choosing an f-stop with a larger number (going from f/5.6 to f/8, for example) and/or setting a faster shutter speed or lower ISO value.

Many cameras provide a range of levels for Zebra settings so you can adjust the strength of the pattern to suit the scene you’re videoing.
Zebra patterns appear as bright stripes superimposed on over-exposed areas. Some cameras let you choose between right-slanting and left-slanting stripes as well as setting the brightness level at which they are displayed. These stripes aren’t recorded on your movie footage; they are only visible on the camera’s screens (EVF and monitor).

An example of a zebra pattern in use.
Focus peaking displays are another visual aid, in this case for manual focusing. Switching the MF peaking settings on allows you to see coloured outlines around areas in the scene that are sharply focused. Most cameras let you adjust the sensitivity level and choose from three or more colours, usually red, yellow and white.

Selecting focus peaking in the camera’s menu.

Focus peaking displays are a useful aid to ensure the parts of the scene you want to appear sharp are actually in-focus. In this case, the selected outlining colour was red and the sensitivity level was mid-range.
Focus peaking is especially useful for complex scenes and where you need to resolve detail in particular areas. It’s also handy when you want more control over the plane of focus.
Focus pulling is a popular creative technique used by professional videographers when they want to switch the emphasis in a scene from one subject to another. It takes practice to master and works better with telephoto zoom lenses than wide angle lenses. But the results are well worth the effort.
The shift in focus must be smoothly executed and requires the manual focus mode. Start by focusing on something in the foreground and hold focus for a second or so before smoothly turning the focus ring on the lens until a more distant subject appears sharp, while the previous subject is out-of-focus.

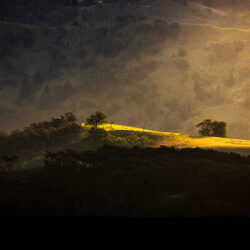
An example of focus pulling to change the viewer’s attention from the dragonfly statues in the foreground (top frame) to the cluster of trees and mountains in the background (lower frame).
Timecoding involves embedding a sequence of numeric codes at regular intervals in a movie clip. Cameras always record time codes in hours, minutes and seconds plus frames. These codes are used for synchronising video frames and soundtracks when editing footage.

Timecoding automatically assigns a time mark to each video frame, making it easy to search for specific recordings and match soundtracks to video.
You can set the start time for time coding and choose between two settings:
- Rec run advances the time coding only while movies are being recorded, causing the time recording to continue each time a new clip is shot.
- Free run continues to time code, whether a movie clip is being recorded or not. This format doesn’t work with time-lapse, high frame rate and movies recorded with filters and it could be affected by changes to the camera’s date and time settings, such as when you reset the camera on crossing different time zones.
Each timecode is specific to a particular frame, making frames easily searchable and enabling editors to accurately match the soundtrack to the video. Timecode data can be displayed in the editing program to help you align video and audio channels when editing clips.
Useful links
This article by Margaret Brown is an excerpt from Videography pocket guide
Pocket guide Partner: Camera House
![]()