We look at the wonderful world of wide-angle lenses; how they’re used and pitfalls to avoid.
These two images show the differences between an ultra-wide (14mm equivalent) and a normal wide-angle (28mm) lens. Both shots were taken from the same position.
According to Wikipedia, a lens is considered wide-angle when it covers an angle of view between 64 and 84 degrees. Anything wider than that is considered ultra-wide-angle, with fisheye lenses being a special sector of the ultra-wide category. Popular wide-angle lenses for cameras with 36 x 24mm sensors have focal lengths of 35mm, 28mm and 24mm; ultra-wide-angle lenses include the 21mm, 20mm, 18mm, 15mm, and 14mm focal lengths.
For digital cameras, many of which have smaller sensors than the 35mm film on which these definitions are based, wide-angle lenses have focal lengths shorter than the short side of the sensor. This equates to about 15mm for an APS-C sensor or 13mm for Micro Four Thirds.
Usage
Photographers normally use wide-angle lenses when they want maximum depth of focus in the scene and need to encompass a large area. This has made them especially popular with landscape, architectural and interior photographers.

Ultra-wide-angle lenses are often used for landscape photography when the photographer needs to encompass large areas of space and emphasise the differences in scale between objects in the scene.
Another common application is where a photographer wishes to emphasise the difference in size or distance between objects in the foreground and the background. While a telephoto lens appears to compress such distances, with wide-angle lenses nearby objects will appear large while objects at a moderate distance usually seem small and far away.
This exaggeration of relative sizes can be used creatively to make foreground objects more prominent and striking relative to their backgrounds. But it’s not always the best choice for close-ups and it highlights one of the inherent issues present in all wide-angle lenses: rectilinear distortion.

Even a relatively modest wide-angle lens (in this case 24mm equivalent) will exaggerate the differences in size between objects in the foreground and those in the middle and far distances.

This close-up taken with a 12mm equivalent lens demonstrates the unsuitability of ultra-wide-angle lenses for some subjects.
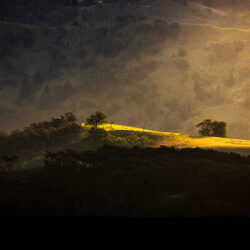
Wide-angle lenses will also create a sense of separation between different elements in a composition. This can be used to convey a sense of isolation, separation and loneliness in pictures as well as showing subjects in a particular context, which can be natural or the built environment.

Even a relatively modest 35mm wide-angle lens can convey a sense of isolation and separateness in a city environment. This is one reason this focal length is popular with street photographers.
Distortion
Wide-angle lenses are, by their nature, prone to barrel distortion in which straight lines are curved out towards the edges of the frame. This happens because the field of view of the lens is wider than the area covered by the image sensor so the image has to be squeezed in to fit within the frame.
This ‘squeezing’ is greatest towards the corners of the frame, which accounts for the barrel-like appearance. The centre of the frame shows relatively little distortion because it’s located on the optical axis of the lens.

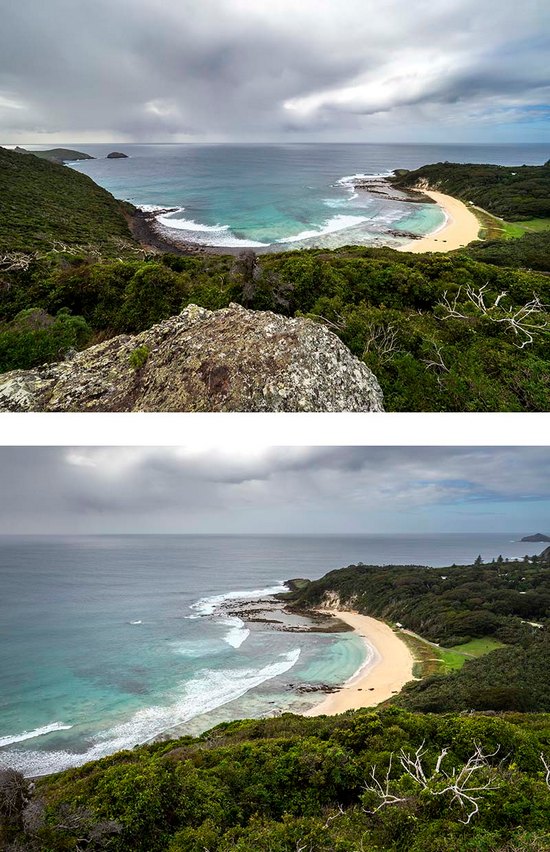
These pictures show the effects of uncorrected barrel distortion in a 24mm wide-angle lens (top) compared with the same image as corrected by software in a modern camera (below).
Barrel distortion can cause vertical lines made by trees and buildings to bow outward, away from the centre of the image. In portraits, it can make subjects look pudgy or large-headed in relationship to the rest of their body. In a zoom lens, barrel distortion normally appears in the middle of the lens’s focal length range and is worst at the wide-angle end.
Like all distortions, barrel distortion increases the more the lens deviates from the ‘normal’ field of view coverage. It’s greatest with fisheye lenses but very obvious from 35mm equivalent focal lengths of about 20mm and wider. The degree of distortion varies with camera-to-subject distance; even 50mm lenses that are virtually distortion-free can display barrel distortion at very close distances.

Even moderate wide-angle lenses can introduce distortions if they aren’t held parallel to vertical lines within a scene. The pair of images on this page show the degree of distortions produced by a 28mm lens (top) compared with the more extreme distortions produced when a 12mm lens is tilted to the same degree.
Today’s digital cameras include software for correcting most common aberrations, including rectilinear distortions. It’s given lens designers greater flexibility and allowed more compact and lower-priced lenses to be developed. But it can also introduce some unwanted side-effects.
Correcting rectilinear distortions usually involves cropping away part of the original image and some redistribution of resolution. Barrel distortion corrections tend to soften edges and corners of the image, while pincushion distortion corrections (where vertical lines bow inwards) make them a little sharper.
Interestingly, most moderate wide-angle lens designs actually counteract the corner softening that is common with these lens designs. Fisheye lenses, which cover angles of view greater than 180 degrees, cause all straight lines outside of the very centre of the frame to become curved as they extend outwards. This causes objects near the edges of the frame to become highly distorted and increases the sense of perspective.

Extreme barrel distortion and wide-angle coverage of at least 180 degrees are key features of fisheye lenses.
Panoramas
While you’d think wide-angle lenses would be great for shooting panoramas, their inherent distortions can make them less than ideal. If the panorama is captured with the camera held in landscape orientation, these distortions will be emphasised. But if the portrait orientation is used with the camera held vertically, they may not be so obvious.

A four-shot panorama recorded with a modest 41mm focal length. Allowance for roughly 30% overlap of frames and the use of panorama stitching software that automatically corrected lens distortions (including vignetting) allowed this result to be achieved with minimal fuss.
Lenses wider than about 35mm are likely to introduce distortions that can be difficult to compensate for, even when you shoot JPEGs with automatic in-camera corrections. Vignetting may also be an issue in some cases. In short, even when you want to encompass a wide angle of view, panoramas are best shot with normal or short telephoto lenses (up to 70mm focal length).
Depth of Field
When using wide-angle lenses you need to be conscious of depth of field in order to set the best exposure parameters for three camera-to-subject distances:
1. The distance at which the main centre-of-interest is located;
2. The distance to the background where you want an acceptable degree of sharpness;
3. The closest area that needs to be acceptably sharp.
Traditionally, photographers have used the hyperfocal distance, which is defined as the closest distance at which a lens can be focused while keeping objects at infinity acceptably sharp or the distance beyond which all objects are acceptably sharp when the lens is focused at infinity. This ‘acceptable’ sharpness will vary according to the lens aperture, with smaller apertures providing greater depth of field.
Lenses with focusing scales will show the near and far distances that will be sharp at a selected aperture, making it easy to estimate depth of field for each aperture setting. In practice, a simple method is to find the closest object in the scene that should appear acceptably sharp, estimate its distance from the camera and double it. Focus on that distance and set an aperture of f/8 or smaller and everything from the foreground object to infinity should be acceptably sharp.
Review the resulting image at a high magnification (preferably 100%) and scroll through it, checking whether the three critical distances are sharp. If not, change the point of focus a little and re-check. Users of mirrorless cameras will normally be able to check these distances without having to take a photo if they use the focus magnification function in the camera.
Diffraction
As you stop down a lens, sooner or later you’ll encounter the effects of diffraction, which reduces image sharpness. With most lenses (including wide-angle lenses) it kicks in somewhere between about f/8 and f/16; with higher-quality lenses being more diffraction-resistant.
So while stopping down will give you a wider depth of field, it also increases the risk of your image becoming unsharp. That’s why it’s advisable to check focus in different parts of the scene. When diffraction affects sharpness, its effect can be reduced by selecting a wider aperture – which will also shorten the area over which the image is sharp. As a photographer, you will need to decide just how much sacrifice is made for each factor.
Article by Margaret Brown (see Margaret’s photography pocket guides)
Excerpt from Photo Review Issue 87