While point-and-shoot cameras automatically pop up their flashes when light levels are low, a surprising number of serious photographers avoid using flash wherever possible. However, used properly, additional light sources can extend your picture-taking opportunities and result in better, more engaging, pictures. The trick is to know what add-on lighting to use and when to use it.

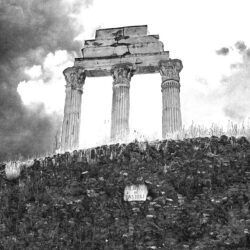
Even the very brief flash exposure was not fast enough to ‘freeze’ the movement of this hummingbird’s wings. Because the bird is small and the background was some distance away, light from the flash did not reach it, enabling the bird to stand out against the dark background. ( © Gregory Cox.)
Artificial light sources are commonly used in four situations:
1. When the photographer simply requires more light to make the exposure.
2. When the ambient light balance is unsatisfactory and the photographer wants to modify it.
3. When the photographer wants modify the direction of the lighting with respect to the subject.
4. When the photographer wants to control other aspects of the light for creative purposes.
The main goals when using any type of artificial lighting are to provide sufficient illumination to enable the subject to be seen clearly and to make the subject appear as natural-looking as possible while doing so. With practice, you will learn quickly where to position lights and how much light will be required in a variety of different situations.
You will also learn when lights must be modified and how to adjust them to achieve their objectives, as well as gaining an understanding of how the artificial light source(s) relate to camera controls for exposure levels and durations. A skilled photographer can manipulate how a viewer is likely to react to photographs of different subjects by manipulating the lighting.
Principles of Light Distribution
Regardless of which artificial light source you use, it will be subject to the Inverse-Square Law, a basic principle that describes the predictable way a point light source radiates and changes in intensity with distance. Put simply, light falls off with the square of the distance.

This diagram illustrates the effect of the Inverse-Square Law, showing how the intensity of light is reduced as distance from the source of the light increases. An object twice as far from the light source receives 1/4 of the light output, while one three times the distance receives 1/9 of the light.
This is how it works: as the distance between the light source and the illuminated object doubles, the light output is spread over four times the area, which means the subject only receives one quarter of the original light. Photographic f-stops are based upon this principle so if the distance of a light source is changed in the following increments: 1, 1.4, 2, 2.8, 4, 5.6, 8, 11, 16 and 22, with each step the light intensity will decrease by one f-stop.

This diagram provides an approximation of how f-stops must be changed to obtain the same exposure as the distance between the light source and the subject increases.
To take a practical example: if you are photographing a group of people using the light from a flash on the camera and one person is 2.8 metres away while another is four metres, the second face will receive one stop less illumination. The Inverse-Square Law also explains why it is pointless to use flash when photographing large subjects more than about 10 metres from the camera, particularly with low-power, built-in flashguns.
The Inverse-Square Law can also be used to work out the relative intensities of different lights in multiple-light set-ups. The distance of the main light will provide the basis for calculating the exposure for the shot. The distance of the key and fill lights will dictate their intensity with respect to the main light.
If you want the fill light to be one quarter as strong as the main light when shooting, it should be twice as far away. Another way of looking at light intensity is that if you can shoot a subject at f/16 when the light source is one metre from it, you will need to open the aperture to f/8 when the light is two metres away and to f/4 when it is at four metres distance.
Light Sources
In the past, only two external lighting options were available to photographers: tungsten (‘photoflood’) lights and flash. Both have long histories of use by professional and enthusiast photographers, although the arrival of compact, portable flashguns that use Xenon tubes has made flash more popular.
Tungsten studio lights are seldom used today. Not only are they cumbersome to set up, they also produce light with a strong orange cast that must be corrected by filters or special white balance settings. They also use much more power than more modern light sources. However, they provide the advantage of continuous lighting that enables photographers to see precisely where shadows lie on the subject and how intense they are. Studio flashes usually come with modelling lights to achieve this objective, although the flash discharge provides the main light source.
Two recent substitutes for continuous lighting are fluorescent and LED lights. Both provide almost illumination that is virtually colour-cast-free and requires minimal filtration and little or no post-capture correction.

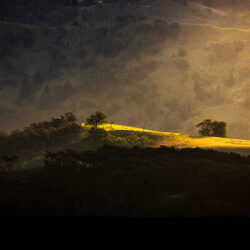
This photograph illustrates the effects that different types of lighting can have upon colours of subjects. The auto white balance in the camera has favoured the warm bias of the halogen and compact fluorescent lights that illuminate the interior, while the fluorescent exterior lights have taken on a distinct blue cast. The only way to correct this imbalance would be to light the entire subject with studio lighting that is colour-controlled.
Most public buildings, offices and homes use fluorescent lighting, whether it be the older tube-style or newer compact fluorescent lights. Older, tube-style lights tended to emit most of their radiation in the green band of the visible spectrum and required magenta filters to correct for their colour bias.
Tubes were available with different colour temperatures; commonly including cool white, warm white and daylight balanced. The white balance controls in many cameras have pre-sets to correct for each one ““ although you have to match the pre-set to the tube’s colour balance. This can be difficult if three or four different types are used in a room.
Compact fluorescent lights are usually balanced to simulate natural daylight and are less prone to flickering than fluorescent tubes. But like all fluorescent lamps they contain mercury vapour, which is toxic, even in small amounts. This makes them difficult to recycle. But they tend to last at least six times longer than tungsten lamps and use much less energy. They also generate less heat.
Recently, LEDs (light-emitting diodes) have replaced other forms of lighting in applications as diverse as car headlights, traffic signals and video displays and become the main source of continuous lighting for photography and video. Relatively cheap to produce, they can output light with a colour temperature of 5600 K, the same as daylight-balanced film.

An affordably-priced LED lighting kit contains a colour-controlled light head with a stand attachment, dual (battery and mains) power connections and a wireless remote control, all packed in a case with a total weight of less than 600 grams. (Source: Kayell Australia.)
Banks of LEDs deliver impressive levels of brightness for a nominal 75 Watt rating and have operating lifetimes of around 50,000 hours, which makes them inexpensive to use. Heat emission is never a concern and lamps can be dimmed and softened just like other forms of lighting.
Using Flash
While many cameras come with built-in flashguns, add-on flashguns are often many photographers’ first choice. They generally provide a more versatile light source ““ particularly when they can also be used off the camera with wired or wireless triggers.
Unfortunately, direct lighting from a flash tends to be very harsh, although photographers who use built-in flashes can usually control the strength of the light output and many cameras include facilities for minimising red eyes in subjects photographed by direct flash.

You can tell this shot was taken with an in-camera flash by the lack of modelling shadows on the subject’s face and the presence of tiny catch lights on the subject’s pupils. The absence of the red-eye effect (caused by light reflecting off the retinas at the back of the subject’s eyes) is mostly due to automatic in-camera processing.
Most flashguns have a diffuser panel in front of the actual tube to soften the light. If this isn’t enough, covering the diffuser with one or two layers of tissue could do the trick. (They can be held in place with thin rubber bands or sticky tape.)
Alternatively, you can make the light falling on the subject come from a larger, softer source by ‘bouncing’ the flash light off a nearby wall or ceiling. You can also modify the light with softboxes and diffusers. A snoot (which is attached over a flash head and funnels light inwards) will direct and concentrate the light if you want stronger shadows.
The main problem with flash is that the actual exposure is too brief to register in the photographer’s consciousness. We are forced to visualise the end result when setting up and decide whether the lighting seems normal/natural or not compared to other cues.
In a studio setting, the lighting is much more controllable and subjects usually expect the photographer to spend time adjusting the positions of lights and taking test shots before the actual photographs are taken. A typical studio lighting configuration contains a single frontal light to illuminate the front of the subject, a fill source to control shadow tones, one or more rim or accent lights to create separation between foreground and background, and one or more background lights to control the tone of the background.
When using flash as a fill-in light in outdoor situations, it is important to match the highlights and shadows on the subject with the ambient lighting in the background. If the background is illuminated by the setting sun, the face in the foreground won’t look ‘normal’ if it receives the full intensity of the flash. The intensity of the flash must be reduced to create an impression of physical separation from the background, revealing facial details but without upsetting the ambient light balance.
TTL vs Manual Flash
Most modern cameras provide TTL (through the lens) flash exposure, based on the camera’s metering system. When the flash is fired, the light hits the subject then bounces back to the camera. Since it is travelling at the speed of light, the camera’s microprocessor has time to calculate the correct exposure while the shutter is open and turn the flash off when enough light has reached the sensor.
In theory, this system should deliver correct exposures regardless of the distance to the subject (allowing for the Inverse Square Law). In practice, many in-camera flashes can’t illuminate subjects further than a few metres from the camera, which means shots will be under-exposed. (More powerful add-on flashguns increase the distance over which the TTL system can operate.)

This portrait sequence shows the difference between ambient and flash lighting, the latter at different levels of intensity. From the left side: ambient lighting only, on-camera flash balanced to -1EV, on-camera flash with no exposure correction, on-camera flash set to +1EV. Note the colour differences between the ambient and flash exposures and the increasing visibility of the red-eye effect as the ratio of flash to ambient lighting increases.
When using manually-controlled flashguns, you must know two parameters: the Guide Number (GN) of the flashgun and the distance to the subject. The guide number for a flash indicates its ability to illuminate a subject at a specific distance, ISO setting and f-number. They are normally given as distance and ISO, for example GN 30 represents 30 metres at ISO 100.
You can calculate the lens aperture by dividing the GN by the distance to the subject. Thus, a subject six metres from the camera would require an aperture of f/5 (30 divided by six).
Normally, guide numbers don’t depend on the focal length of the lens, although some flashes can ‘zoom with the camera’ and concentrate their light into a narrow beam when a telephoto lens is used. This increases the effective GN, although it causes the flash to illuminate a smaller area.
Many flashguns have a sliding scale on their rear panels to make it easy to calculate the best aperture for correct exposure. But if the subject is predominantly white or light in tone, it will probably need a little less exposure than one with normal tonality, while a dark subject will require a little more.
Shooting Tips
The following tips will help you to capture natural-looking photographs with artificial lighting.
1. When shooting portraits, establish a comfort zone between the camera and the subject. Choose an appropriate lens (75mm to 105mm focal length equivalent is ideal).
2. Choose an aperture that provides the depth-of-field you want, selecting wide apertures to create soft, out-of-focus, non-distracting backgrounds. Adjust the shutter speed (and ISO, if necessary) to obtain the correct exposure level, taking account of the flash synch speed limit (which sets the fastest shutter speed you can use to cover the entire image frame).
3. Take a shot and evaluate the results. Correct all obvious problems by moving the light (if external to the camera), adjusting the light output with in-camera compensation settings, bouncing the flash and/or reducing the output with light modifiers (diffusers and reflectors). Gobos ““ materials inserted in the light path to diffuse the light ““ can help to spread and soften directional light from single lamps or flashguns.
4. If you’re using multiple flash units ““ and many DSLR and CSC cameras support multi-flash set-ups ““ be aware of the possibility of creating multiple shadows which can make your image look unnatural. Position and adjust lights to minimise this possibility.
5. Control the relative brightness of the background by moving the light away from it. As we know from the inverse square law, if the background is twice the distance from the flash as the subject it will be two stops darker. Moving the flash and subject further away from the background will make the background darker still.
6. The exposure of the background, however, which is lit by the ambient light, will change in brightness when shutter speed changes. Longer exposures provide more time for the ambient lighting on the background to reach the camera, resulting in brighter backgrounds. The subject in the foreground will look the same whether you extend the exposure to brighten the background or shorten it to make the surroundings darker.