Photographers may invest a lot of money in lenses that produce sharp images, but they often fail to capitalise on their investment by not applying sharpening post-capture.
|
Photographers may invest a lot of money in lenses that produce sharp images, but they often fail to capitalise on their investment by not applying sharpening post-capture. Some readers may be surprised to know that all digital images can benefit from post-capture sharpening. However, a close examination of any unedited image will show it could be improved. Two factors cause digital images to be slightly unsharp – even when they are in focus. For starters, the interpolation used to create colours tends to blur edges very slightly. Furthermore, the anti-aliasing filters used to minimise the blocky appearance of digital images add to this blurring. Image sharpening is all about defining edges because the human brain has developed a highly refined ability to detect areas where detail changes from one tone or colour to another. In an image we see as ‘sharp’, these transitions happen quickly, over a small area. In a ‘soft’ image, these transitions are spread across a wider area and reduce the perceived quality of the image because, by nature, we see all soft edges as being slightly out-of-focus. In reality, most image sharpeners work by over-correcting, pushing tonal and colour adjustments slightly beyond where they should be to emphasise edge transitions without changing them away from the edges. This tricks our eyes into ‘seeing’ more detail than there really is. However, this sharpening will only be effective on images that are in focus. No amount of post-capture sharpening can make unfocused shots look sharp. Post-capture sharpening can restore the appearance of sharpness photographers expect to a digital picture. But a light touch is essential when applying sharpening filters because it’s very easy to introduce unattractive artefacts if you push sharpening too far.
In this feature we’ve used the popular freeware application, The GIMP, to look at two popular sharpening techniques and explain just how far you can push them without affecting the quality of your image.  The GIMP desktop with our sample image open.
Edge Sharpening Edge sharpening tools work by emphasising the differences between regions of different contrast – which means edges. Adjustments are normally linear; you simple move a slider until you obtain the desired result. No masking is involved and, therefore, sharpening tools are less precise than most other methods for increasing image sharpness. However, they are less prone to edge-related artefacts than unsharp masking (see below). In The GIMP, the Sharpen tool is found in the Filters drop-down menu. Click on Enhance and select Sharpen.  The trick when using this tool lies in knowing where to stop – and this will vary with different images. The illustrations below show three levels of adjustment with the Sharpen tool in The GIMP.  An enlarged section of the original image with no sharpening applied.  The ideal sharpening level for this image. Edges have been sharpened without producing visible artefacts.  Pushing the sharpening adjustment level to its highest point makes the image look very granular. However, no edge effects (halos along contrasty edges) can be seen.
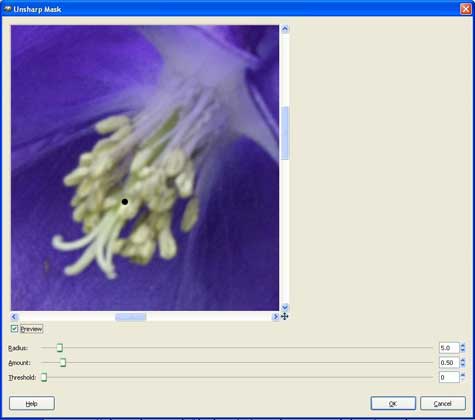
Unsharp Masking.  The Unsharp Mask control is found in the Filters drop-down menu. Click on Enhance and select Unsharp Mask.  Three adjustments are typically provided in the unsharp mask sub-menu: Amount, Radius and Threshold.  The illustration above is a reference image that shows an enlarged section of the original photograph with no adjustments. Note the overall slightly blurred appearance of the original.   Amount, which is shown as a percentage, controls how much contrast is increased at the edges. The illustrations above show the effect of this adjustment.   Radius adjusts the width of the edges you wish to process. Small Radius settings apply adjustments to finer detail.   Threshold sets the lowest brightness level that will be adjusted and can be used to direct sharpening to only the most obvious edges, leaving the subtle transitions unchanged. It is often used to sharpen fine features like eyelashes without affecting the smooth texture of skin. You can avoid colour shifts when using unsharp masking by creating a duplicate layer (Layer>New Layer) and carrying out the unsharp masking on it. Then blend the sharpened layer with the original using the Value mode in the Layers palette. The illustrations below show how correct sharpening can be used to restore the captured image to the level of sharpness you would expect from a high-quality lens.  The original image as captured by the camera.  The same image with unsharp masking applied in The GIMP.
Sharpening Artefacts 
Sharpening Rules 2. Save a copy of the adjusted image BEFORE applying any sharpening. Then if the image doesn’t print as you want it to after you’ve applied sharpening, you have a corrected image to return to. 3. If you’re printing the image on an inkjet printer, slight over-sharpening usually gives better results than under-sharpening – particularly with larger print sizes. 4. It takes a little practice to know how much sharpening to apply to each image because there’s no universal ‘best’ level. In most cases, you should be guided by the image itself and by the printer you are using. Experience with your own shots and printer will be your best guide, so expect to use up several sheets of paper while you fine-tune sharpening settings to discover what looks best.
|


