In summary
The new ProArt Display OLED PA27USD delivers professional-standard features and performance for content creators’ workplaces where efficient connectivity is required.
Full review
Announced at the IBC 2025 show in Amsterdam last September, the new ASUS ProArt Display PA27USD is one of a number of high-tech, creator-focused products shown on the ASUS booth. This screen was also featured at the CES show in Las Vegas in January 2026, where it received an Innovation Award. The current flagship model in the ASUS ProArt Display range, it’s a step up from the ASUS ProArt Display PA27UCGE monitor we reviewed in August 2025. It’s also the only model with an OLED panel (the others have backlit LEDs with in-plane switching) and features an advanced panel design with a graphene film behind the QD-OLED panel to dissipate heat. Like the PA27UCGE, it has a built-in, motorised calibrator for maintaining colour accuracy and saves colour parameter profiles on an internal scaler IC chip. This means users can connect this screen to devices with different operating systems or applications without needing to adjust settings. The saved profiles can be easily activated via the hotkey on the monitor.
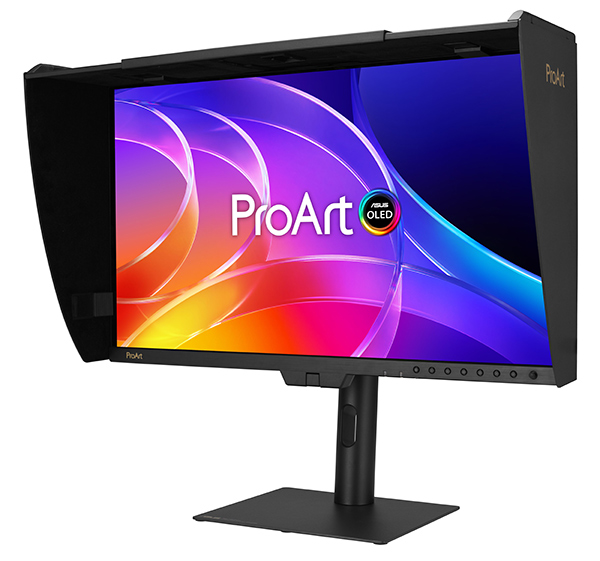
Angled view of the ASUS ProArt Display PA27USD on the supplied stand with the bundled shading hood installed. (Source: ASUS.)
The PA27USD also includes built-in functions that minimise chances of image burn-in when pictures are displayed for extended periods. Users can set the sensing level to match the type of work they are doing.
An Anti-Glare, Low-Reflection (AGLR) coating creates a paper-like screen effect to minimise distracting reflections. This monitor also includes a blue light filter for eye protection plus a built-in Ambient Light Sensor that readjusts the display’s brightness and colour temperature as the workplace illumination changes to ensure consistent viewing throughout the day.
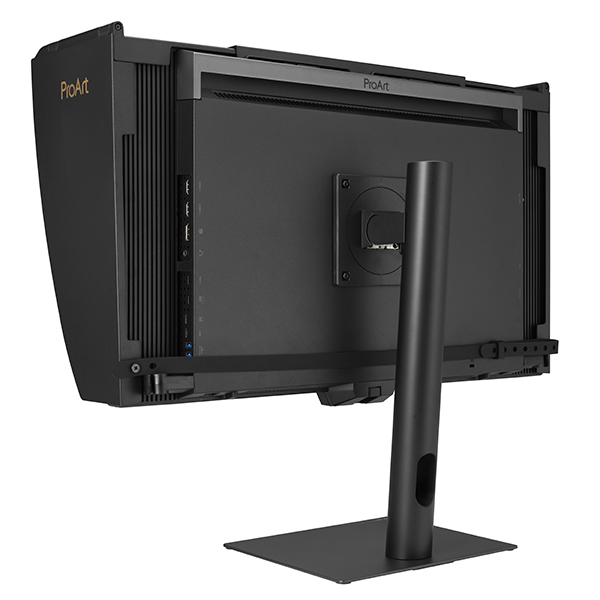
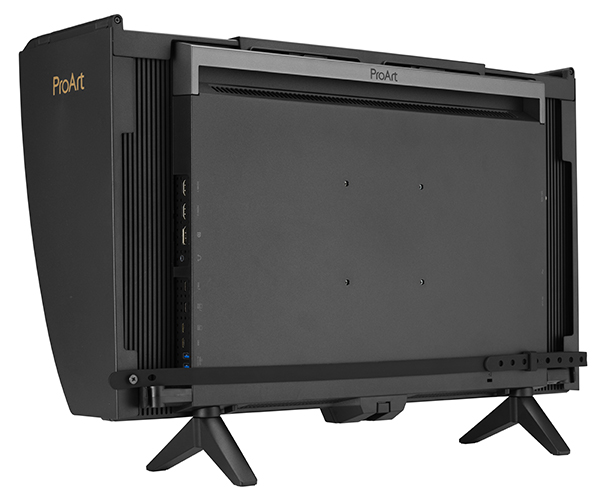
Rear view of the ASUS ProArt Display PA27USD on the supplied stand with the bundled shading hood installed. (Source: ASUS.)
Who’s it for?
The PA27USD has been designed primarily for content creators and provides a desirable combination of features in a relatively compact package, albeit at a high price tag for a screen of this size. While they may provide genuine benefits for professional photo/video editors, it could be difficult for even serious photo and video enthusiasts to justify the high cost of this screen.
However, professional video editors will genuinely benefit from the inclusion of an SDI (Serial Digital Interface) because it allows uncompressed video to be transmitted over longer distances with high reliability using BNC-type cables with locking connectors at both ends to prevent them from being disconnected inadvertently. Both features would be valuable in busy professional workplaces.
Compatibility with popular computer operating systems is another worthwhile feature for professionals – particularly those who work across a variety of different set-ups. This means the screen can be setup for a Windows computer, using the supplied HDMI cable, as we did for this review and then moved to a MacOS-based workspace.
Setups based on MacOS computers can be connected via either of two Thunderbolt 4 ports, which are compatible with all MacOS computers, including both MacBook Pro and Mac mini. With each port providing up to 96W of power delivery, a laptop can be powered, charged, and connected to the display through a single cable, reducing desktop clutter.
These ports support data transfer speeds up to 40Gbps, and allow daisy-chaining multiple monitors for a seamless multi-screen setup. Other connectivity options include HDMI ports, plus a built-in USB hub, which make it easy for users to connect different devices in their workflow.
ASUS also includes access to its ProArt Color Centre, a centralised colour management tool that can be used to schedule calibration, customise colour parameters and maintain professional-level accuracy and consistency across dispersed production workflows. This makes the PA27USD ideal for multi-city and multi-national facilities where accurate colour control is vital.
The PA27USD comes factory pre-calibrated showing coverage of the main colour spaces in use by professional photographers and videographers and claims an average Delta E value of less than one for outstanding colour accuracy. A detailed report of the factory testing is included with each screen.
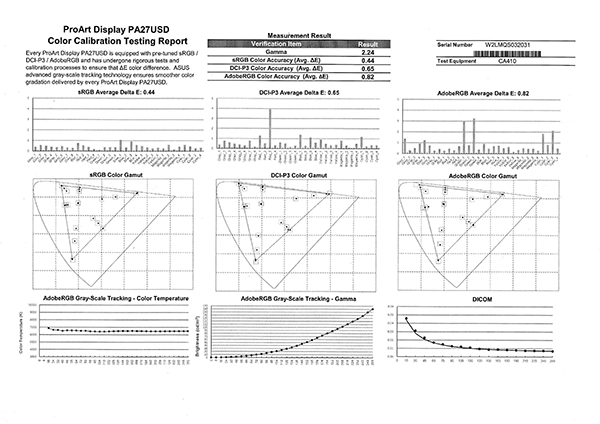
The detailed colour calibration testing report supplied with the monitor we reviewed.
The screen supports multiple HDR-10 curves, including PQ Clip, PQ Optimised and PQ Basic with a special HDR Preview mode that allows users to view content with an HDR-simulation effect, without requiring HDR metadata. Multiple HDR metadata formats, including HDR-10 and HLG are also supported and the PA27USD works seamlessly with Calman and Light Illusion ColourSpace CMS professional hardware calibration software.
Setting Up
Setting up the PA27USD should be straightforward, thanks to clear diagrams in the downloadable user manual as well as on the inside of the lid of the box it comes in. You start by attaching the hinge plate to the back of the monitor with the supplied screws (a small screwdriver is provided).
To assemble the regular monitor arm and base, you simply screw the base onto the upright column (no screwdriver is required as the screw has a convenient loop attached) then lock the column onto the hinge plate on the screen. The screen comes with a power cord and the necessary HDMI and USB cables.
When it’s packed in the delivery box, the PA27USD comes with a short stand attached. It plugs into mounting holes on the base of the screen and can be easily removed by holding down the quick release button located on one side of each ‘foot’ if you want to mount the screen on the regular stand.
Front and rear views of the monitor screen on the mini stand. (Source: ASUS.)
The short stand is ideal for use in dual-monitor set-ups where limited desk space is available. It can also be handy for quick set-ups in multi-site situations. Regardless of whether you use the regular on short stand, fitting the supplied wraparound hood is straightforward and it should be done to reduce on-screen reflections from nearby light sources and make calibrations more accurate.
The hood is packed flat with its arms secured by tapes, which must be removed. Then you simply flip the sides down, fit the hood to the screen, adjust it to size and secure it with the fittings provided.
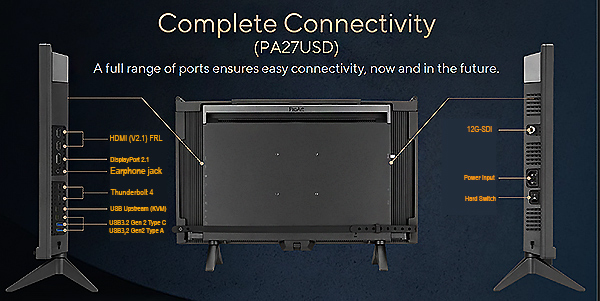
This illustration shows the locations of all the cable ports. (Source: ASUS.)
Cable clips are included for attaching to either side of the monitor to keep cables from getting in the way. They are secured with push-in clamps.
The sensor for the colorimeter is embedded into the base of the screen in an extension in the centre of the bottom bezel. It flips around to cover a small area on the lower edge of the screen when calibration is taking place. The diagram below shows the degree of movement involved.
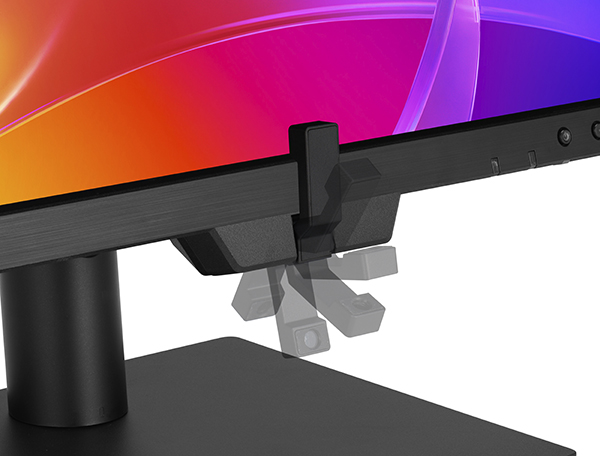
Close-up showing the flip-up, built-in calibrator. (Source: ASUS.)
It’s easy to adjust the screen to suit your working position when it’s mounted on the regular stand, thanks to 130 mm of height adjustment plus between +23 and -5 degrees of tilt and 30 degrees of swivel each way. The screen can also be pivoted through 90 degrees for vertical work – and the on-screen display (OSD) will rotate automatically for vertical viewing.
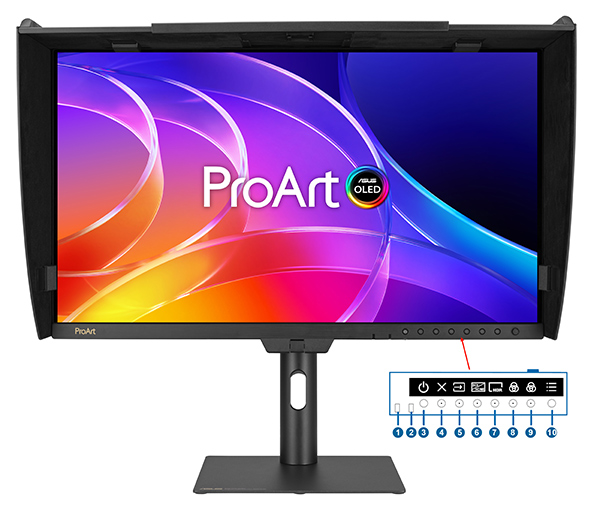
This illustration shows the location of the main button controls. (Source: ASUS.)
The line of buttons on the lower bezel starts with the proximity and ambient light sensors (1 & 2) then provides shortcuts to the power on/off (3) plus the following functions: exit (4), input select (5), SDI/HDMI (6), HDR (7), two shortcut buttons (8 & 9) and the menu (5-way) (10). The shortcut buttons are programmable but default to energy saving and brightness adjustment hot keys. Pressing any button (except the power button) accesses the OSD menu. Self-Calibration can be triggered by monitor OSD and ProArt Calibration Software.
This monitor has also been designed to accommodate optional the ASUS-designed MK03 mini-computer kit. A dedicated fitting on the rear of the monitor stand with attachment sockets for screws is provided for mounting NUC / Mini- PCs.
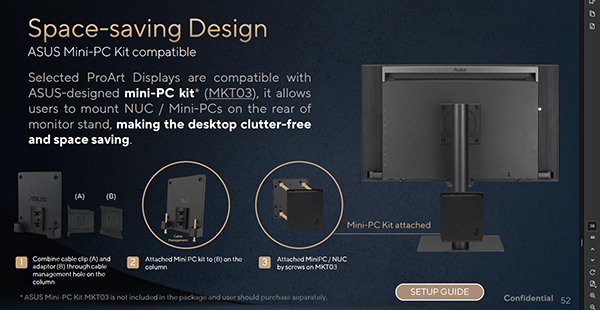
This screen grab shows the optional Mini PC kit attachment. (Source: ASUS.)
The ASUS DisplayWidget Center app allows users to tweak monitor settings with a mouse instead of using the buttons on the monitor. It can be used with both macOS and Windows setups and displays automatic notifications and the settings saved in the on-screen display. It also includes adjustments for customisable monitor settings, KB and Hotkey setting, app adjustments, multi-screen modes and colour sync.
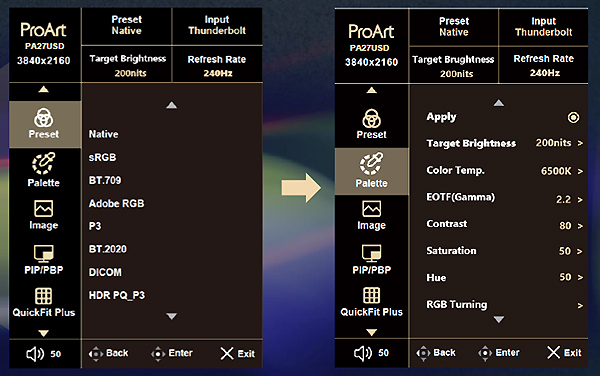
The on-screen display, showing the initial configuration menu and the Palette adjustments. (Source: ASUS.)
The new on-screen display (shown above) provides quick views of current screen settings, making it easy to select display modes and make necessary adjustments. The ProArt presets cover all the main colour spaces used for photography, printing, web design, digital cinema, 4K content development for broadcast and games, satellite TV and movie productsion.
On the lower bezel of the rear panel, you’ll find a Kensington lock slot along with the slots for fitting the short stand.
Performance
The first impression we had when the screen had powered-up and was displaying images was surprise at just how bright it was and how richly it displayed colours. It also handled the broad range of tones competently in all the images we displayed, which varied between shots with bright, saturated colours and strong contrast to subtle, misty scenes.
Blacks were deep and rich, while whites were clear with smooth transitions between the brightest tones and those just a little bit less bright. When compared with a normal LED backlit screen in a dual-screen set-up, the PA27USD’s OLED screen really stood out, appearing brighter, more colourful and ‘punchier’ overall – even though the older LED screen was a very good performer.
We set the PA27USD to the Adobe RGB mode before carrying out our standard tests with the SpyderX Elite and Datacolor’s software and covered the same parameters as we use for all monitor reviews. This enables us to compare its performance with other monitors we have reviewed in the past. The Advanced Analysis graphs of the individual tests are presented below.
1. Colour Gamut
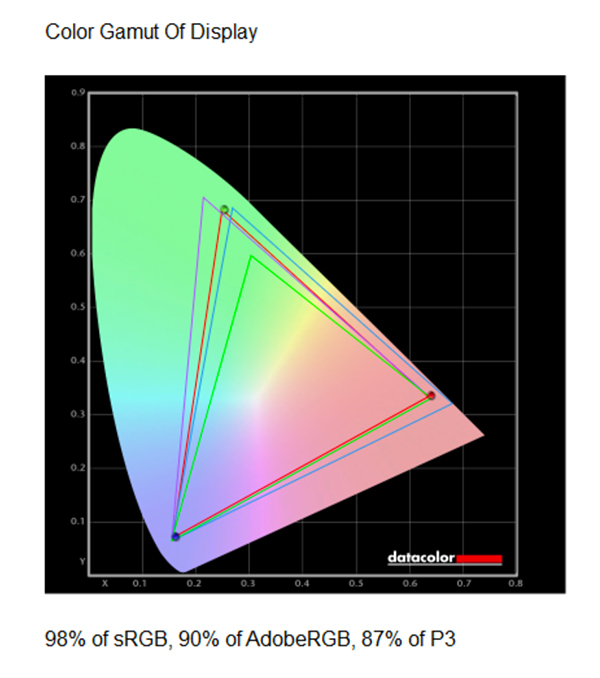
In the diagram above, the green triangle shows the boundaries of the sRGB colour space, while the purple triangle delineates the Adobe RGB colour space and the blue triangle shows the P3 colour space. The red triangle shows the measured colour space for the monitor, which based on the initial factory calibration covered 99% of the sRGB colour space, 87% of the Adobe RGB colour space and 86% of the DSC-P3 colour space. This is not quite as good as the measurements we obtained for the PA27JCV.
2. Gamma
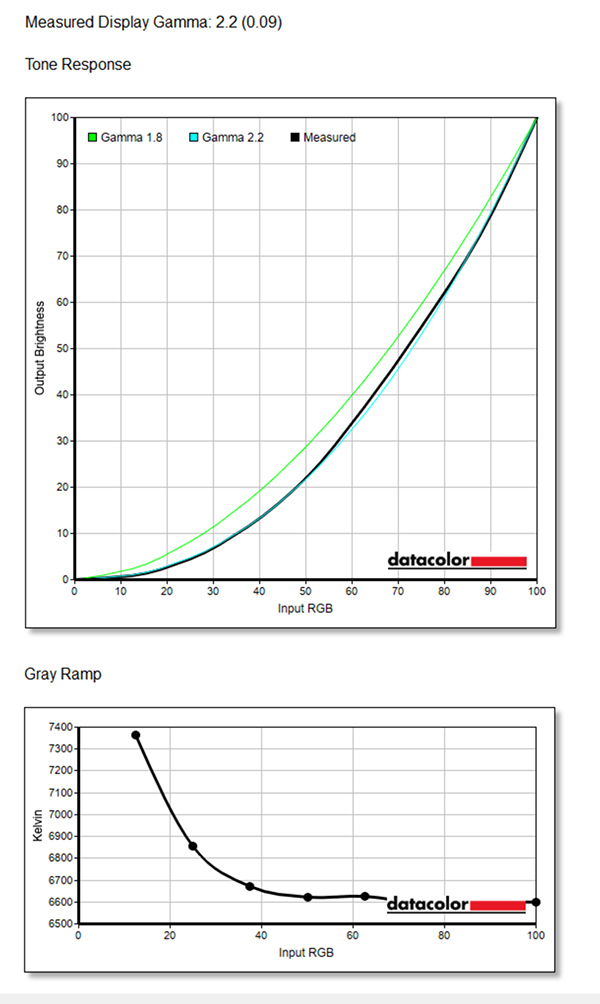
Gamma plots show the relationship between the brightness of a pixel as it appears on the screen, and the numerical value of that pixel. They are a good indicator of how mid-tones are reproduced.
Traditionally, Windows has adopted a gamma value corresponding to television (2.2), while the Mac OS adopted a gamma value corresponding to commercial printers (1.8). If gamma is set too high, mid-tones appear too dark. A low gamma value makes the mid-tones appear brighter.
The graph of the measured gamma (above) shows it to be very close to 2.2, the recommended gamma for image editing with Windows PCs; a very good result. The grey ramp is also relatively smooth with very slight unevenness towards the higher values.
3. Colour Accuracy
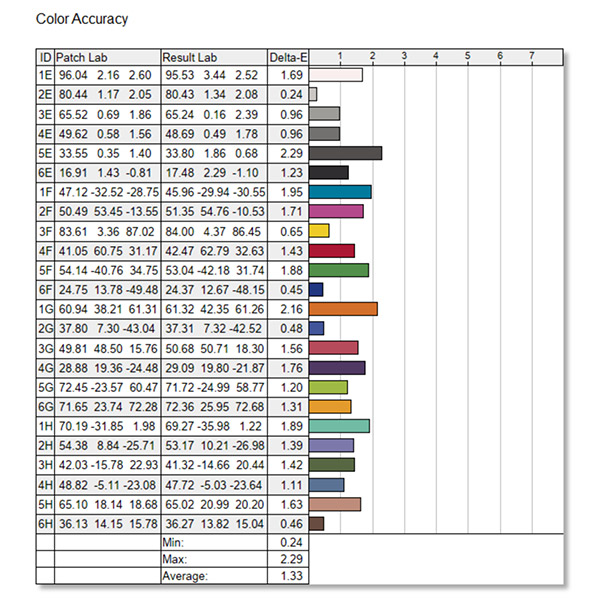
The colour accuracy showed fairly minor deviations from the ideal theoretical values across most of the 24 measured values. The largest deviations occurred in the dark grey and orange bands but the differences were quite small and the overall average was 1.33, which is an excellent result and shows the factory settings to be good for editing both stills and videos.
4. Brightness, Contrast and White Point
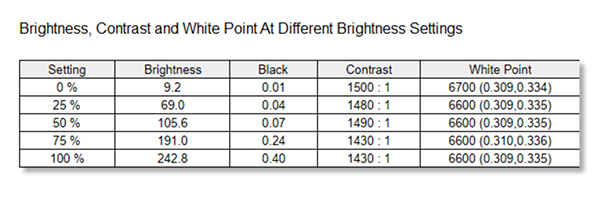
The contrast ratio results were relatively consistent, with both the white point readings and the black point readings tracking slowly upwards, as expected for the increase in screen brightness settings.
5. Screen Uniformity
The two Screen Uniformity tests check the brightness and colour consistencies of the display in nine sections of the screen, at various luminance levels. Separate graphs are measured for luminance (brightness) and colour measurements across four luminance levels. We present the upper and lower graphs for each category.
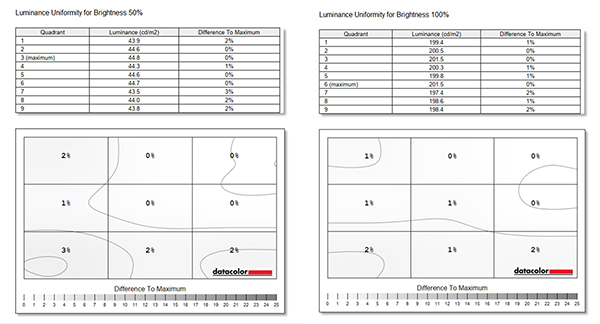
5a. Luminance Uniformity
Both luminance uniformity readings showed relatively even brightness levels all over the screen, with only a 2% maximum deviation at 100% brightness and 3% at 50% brightness. This is shown as a good score on the overall monitor rating.
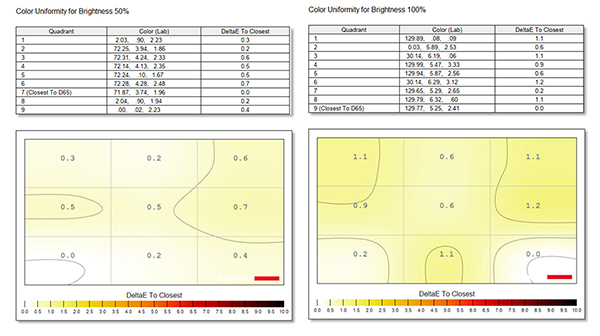
5b. Colour Uniformity
Colour uniformity measurements showed no signs of a ‘hot spot’ at either 50% or 100% brightness. This is an excellent result and reflected in the ‘perfect’ score in the overall monitor rating.
6. Before and After Views
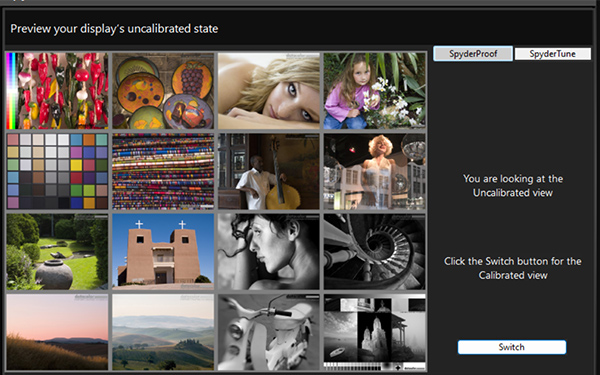
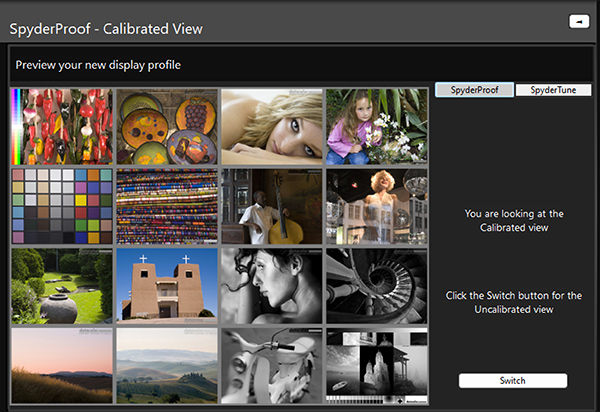
The ‘before’ (top) and ‘after’ (below) displays produced by the SpyderX Elite 6.2 show the effects of calibration. The close similarities between these displays showed the PAUUSD ships with very good colour settings.
Overall Rating
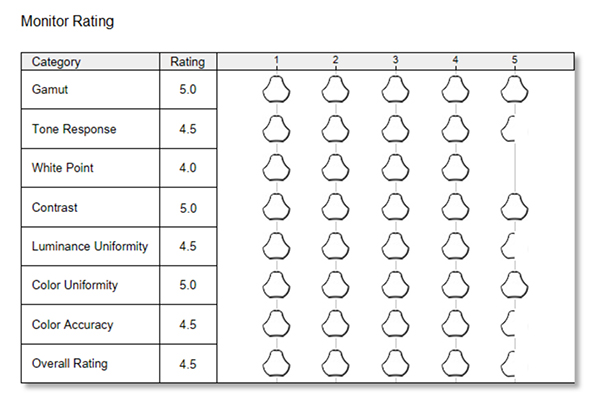
The overall rating shows the ASUS ProArt Display PA27USD to be a very good performer on the whole, which you’d expect, given its relatively high price tag. Its main strengths are its excellent gamut coverage, contrast ratings and colour uniformity, with its main weakness being white point precision, although whether this would be enough to impact normal viewing quality and the ability to use the screen for editing stills and video clips is debatable.
Conclusion
Login or Register to access the full article.
SPECS
Panel size: 27-inch (26.9-inch viewable)
Aspect ratio: 16:9
Active display size (h × v): 589.97 x 332.93 mm
Panel type: 4K QD-OLED with anti-reflective coating
Viewing angles: 178 degrees horizontal and vertical
Brightness: 1,000 cd/m² peak brightness (approx. 250 cd/m² typical). Supports HDR10 and HLG, with VESA DisplayHDR TrueBlack 400 certification
Contrast ratio: 15,000,000:1 (true 10-bit colour)
Response time: 240Hz refresh rate with a 0.1ms response time
Native resolution: 3840 x 2160 pixels
Pixel pitch: 0.153mm
Display colours: 1073.7 million (10 bit)
Wide gamut coverage: 99% DCI-P3, 100% sRGB, 97% Adobe RGB, with 10-bit color depth
Calibration: Factory pre-calibrated (∆E < 1) with built-in motorised, flip-out self-calibrator
HDR Support: HDR10, HLG, Dolby Vision
Colour Temp. Selection: Yes (5 modes)
Gamma adjustment: Supports Gamma 1.8/2.0/2.2/2.4/2.6
Colour adjustment: RGB Tuning (Gain / Offset)
Colour accuracy: △E< 1
Preset modes: Native / sRGB / BT.709 / Adobe RGB / P3 / BT.2020 / DICOM / HDR PQ_P3 / HDR PQ_BT.2020 / HDR HLG_BT.2020 / HDR HLG_P3 / Dolby Vision / CAL 1 / CAL 2 / CAL 3
Adaptive Sync support: Yes
Certification: Calman Verified, TÜV Flicker Free, TÜV Low Blue Light
Connectivity: 12G-SDI for professional broadcast workflows, dual Thunderbolt 4 (96W power delivery), DisplayPort 2.1, HDMI 2.1 and USB hub (USB 3.2 Gen2 Type-A x 2, Type-C x1)
Audio: 2 x 3 W (stereo), RMS
Power consumption 100-240V & 50/60Hz: Power On (Typical) <32W; power saving mode: <0.5W
Position adjustments: Height Adjustable, Pivot, Swivel, Tilt
Accessories: Includes a wraparound hood with top opening for third-party colorimeters, Calibration Report, Quick Start Guide, Warranty Card, Ultra High-Speed HDMI cable, power cord, two-piece Cable Clip and Ergo Stand
Dimensions (w x h x d): With Stand: 61.03 x 58.49 x 22.22 cm; without stand: 61.03 x 37.88 x 59.60 cm
Net weight: 7.42 kilograms with stand, 4.7 kg without stand
Distributor: ASUS Australia Pty Ltd
Rating
RRP: AU$3,499
- Build: 9.0
- Ease of use: 8.8
- Viewing quality: 9.0
- Versatility: 9.0
BUY