In summary
The PA27JCV is a competitively-priced screen that delivers an excellent experience for viewing both stills images and movies. It’s bright and colourful with deep, rich blacks and sparkling whites. Its ability to display detail is impressive.
It provides sufficient flexibility for content creators of all types and at all levels. We found the factory calibration required little or no tweaking before use.
For these reasons we’ve awarded the PA27JCV an Editor’s Choice rating and can recommend it to anyone who wants an enjoyable screen for everyday use at a price that won’t put too big a dent in the budget.
Full review
Released in late October 2024, the ASUS ProArt Display 5K PA27JCV offers a comprehensive feature set for enthusiast and professional users in the imaging, video and graphic design fields who want leading-edge technology and compliance with the display standards in a well-built, competitively-priced screen. Unlike some screens we’ve reviewed previously, it is not designed for gaming. It is, however, a major step up from the ProArt PA27UCX-K 4K HDR IPS monitor we reviewed in June 2022 thanks to its high pixel density. Calman-certification confirms its suitability for use in professional photo or video environments, while the screen also boasts factory-calibrated picture modes that correspond to every colour standard in current use.
Angled view of the ASUS ProArt Display PA27JCV. (Source: ASUS.)
While 4K resolution has become increasingly common in all kinds of screens, there aren’t so many with 5K 5120 x 2880-pixel resolution in the more compact, 27-inch, 16:9 aspect ratio size. Apple largely dominates this market, with a series of ‘Retina’ screens with different glass options with prices ranging from $2499 to $3599, although they’re all designed for MacOS computers. The remaining competitors are Windows and MacOS compatible and comprise two screens from BenQ (both priced around $2000) and one from Samsung selling for $2299.
So, why would you choose a 5K monitor over a 4K one if its main use will be for image and/or video editing? The answer lies in resolution, where 5K monitors display 33% more pixels. On a 27-inch screen this translates into 218 pixels per inch (ppi), which means it becomes near impossible to see pixel structure and tonal gradations are much smoother.
Who’s it for?
Of the four ProArt displays listed currently on the local ASUS website, the PA27JCV is the only one with 5K resolution; the rest of them have 4K resolution and price tags ranging from a low of just under $800 to $2899 for the PA27UCX-K 4K (which is in short supply and may be being phased out). While a 4K screen may be adequate for entry-level users and those on tight budgets, the advantages of the PA27JCV send a compelling message to buyer who want the best possible viewing qualities and have a little more to spend.
The main target market for this monitor screen will be photo and video editors seeking a relatively compact screen with high performance and compliance with the display standards in common use in the imaging and graphics markets. The Asus ProArt series of professional monitors have long been sought after for the features they provide and their innovativeness and flexibility, which are delivered at affordable prices.
The PA27JCV combines high pixel density with colour mode support that extends from sRGB to BT.2020 with covers both photo and video gamuts. Each mode has been factory calibrated to the correct values for grayscale, gamma and gamut tracking. For image editors, Asus claims the screen can display the full sRGB gamut as well as 99% of DCI-P3 and 95% of Adobe RGB.
HDR10 is also supported, along with three different Perceptual Quantisation (PQ) curves and Dynamic Dimming utilises the backlight to synchronise the brightness and contrast in line with image changes.
The standard dynamic range contrast is around 5,200:1, while HDR contrast extends to just over 6,500:1. The lack of Full Array Local Dimming (FALD), which enables discrete zones to be dimmed or brightened according to the content on the screen, keeps the overall price of the screen so competitive. In addition, the screen sports a low-glare coating, which minimises reflections.
We found the PA27JCV took up minimal space on our desktop and was easy to integrate into our dual-screen setup, even when different resolutions are involved. We were able to pair it with a 12-year-old 25-inch screen with 1920 x 1200-pixel resolution – although we had to adjust the magnification for the 5K screen to make text easier to view.
It also supports a wide range of video formats via USB-C, HDMI and DisplayPort inputs for integration into PC-based workflows. Each monitor is calibrated in the factory before it is shipped to ensure any discrepancies in brightness and colour across the screen are detected and removed, which makes it ready to use out-of-the-box.
Environmentally-conscious readers will be pleased to learn ASUS ships the PA27JCV in recyclable moulded pulp packaging, rather than Styrofoam, although some components come in thin foam plastic sheathing. This means you can put most of the packaging in the recycling bin once you’ve set the monitor up.
Setting Up
Setting up the screen should be straightforward; you simply screw the base onto the upright column (no screwdriver is required as the screw has a convenient lop attached), connect the attachment panel to the back of the screen via its bayonet mount and slot the screen onto the upright arm. The screen comes with a power cord and HDMI cable – but no USB cable and no shading hood.
The stand isn’t quite as solid as the one provided with the PA27UCX-K but the screen itself is much lighter. We found it to be nice and stable during our testing period and have rated it accordingly. There’s a large oval hole in the upright column about 70 mm up from the base that you can pass cables through to keep your setup tidy.
It’s easy to adjust the screen to suit your working position, thanks to 130 mm of height adjustment plus between +23 and -5 degrees of tilt and 60 degrees of swivel each way. The screen can also be pivoted through 90 degrees for vertical work – and the on-screen display (OSD) will rotate automatically for vertical viewing.
The narrow bezels surrounding the screen along the top and sides are discrete and unobtrusive, while the lower bezel is just wide enough for the equally discrete control panel, which includes an ambient light sensor, power on/off button, input select button, two shortcut buttons an exit button and a five-way button for accessing the OSD menu. The shortcut buttons are programmable but default to energy saving and brightness adjustment hot keys.
Pressing the Menu button opens the OSD menu, while moving the toggle up, down or to the side selects individual items from the list displayed. You can exit the OSD menu by pressing the Exit button to its left.
On the rear panel you’ll find a Kensington lock slot and power switch as well as an AC-in port. There are four USB ports, one Type A and three USB 3.2 Gen 1 Type C ports (one of which can mimic DisplayPort functions), along with an HDMI 2.1 and a DisplayPort 1.4 for video links. An additional USB A and USB-C ports are located under the front bezel at the right-hand end.
Once the monitor has been connected you should use the OSD menu to select the optimal display mode for the tasks you want to accomplish. The default colour space is sRGB, which has a limited colour gamut so we’d recommend changing to Adobe RGB for image editing or DCI-P3 mode for editing video. Alternatively, the Rec.709 setting lets you choose from four colour temperatures and five gamma values if the other modes don’t meet your need.
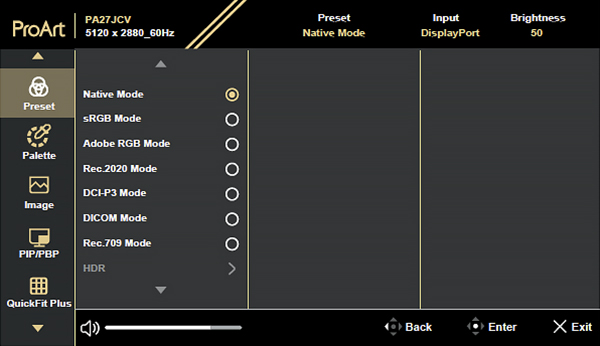
The initial OSD menu, copied from the downloadable user manual.
Adjustments to brightness, contrast, saturation, hue, colour temperature, gamma and black level are carried out in the Palette menu, with the Image menu providing options to tweak the sharpness and select the aspect ratio from three options: Full, Dot to Dot or 1:1. You can also adjust the response time of the screen to prevent motion-related traces, adjust the strength of the blue light filter and map the input range between black and white.
The PIP/PBP menu lets you open another sub-window connected from another video source (when input source is below 60Hz) besides the main-window from your original video source. The QuickFit Plus menu lets you access different alignment patterns and display (or hide) a centre marker, position a ruler on the top and left side or flip the image horizontally.
Features
ASUS lists the key features of the PA27JCV monitor as follows:
– 27-inch 5K (5120 x 2880) LuxPixel AGLR display with IPS 178° wide viewing angle panel;
– International colour standard 99% DCI-P3 and 100% sRGB wide colour gamut;
– Calman Verified with factory calibrated for excellent Delta E < 2 colour accuracy
– Extensive connectivity including DisplayPort over USB-C with 96W Power Delivery, DisplayPort, HDMI and USB hub;
– Light Sync solution support Ambient Light Sensor and Backlight Sensor for reliable colour performance from the start;
– Built-in Auto KVM allows for effortless switching between two connected laptops or PCs with a single keyboard and mouse;
– Ergonomic design with tilt, swivel, pivot and height adjustments for a comfortable viewing experience;
– Green Sustainability: paper packaging and energy-efficient environmental standards.
Other features include a front-mounted sensor that can manage room light compensation to maintain visual stability. It also includes front-mounted button controls for power, input selection, two shortcut buttons, an exit button for the ODS menu and a 5-way menu button.
Subjective Assessment
Straight out of the box, the PA27JCV is a great looking monitor and will bring out the best in the photos and movies you view on its screen. Once you have it configured to your liking, they’re likely to look even better.
We’d recommend purchasers download the user manual from the ASUS website as it provides a fairly good list of steps to follow when setting up the screen, whereas the supplied printed quick start guide is basic to say the least and only contains diagrams to help you get connected.
Once the monitor has been connected you should use the OSD menu to select the optimal display mode for the tasks you want to accomplish.
The default colour space is sRGB, which has a limited colour gamut and blocks you from adjusting brightness and saturation so we’d recommend changing to Adobe RGB for image editing or DCI-P3 mode for editing video. Alternatively, the Rec.709 setting lets you choose from four colour temperatures and five gamma values if the other modes don’t meet your need.
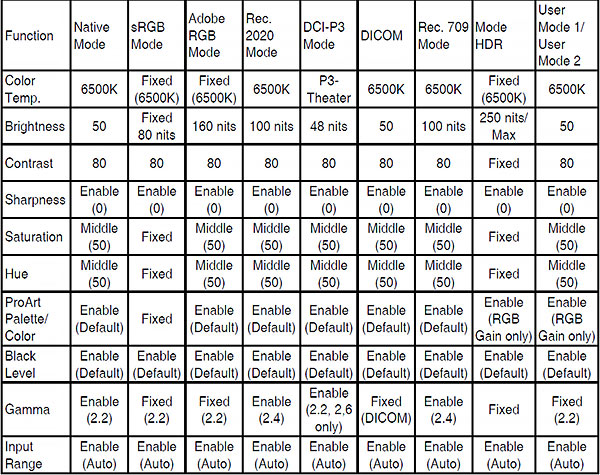
The table above, copied from the user manual, shows the default configurations for each preset mode. Note the wide differences in brightness levels between the sRGB, Adobe RGB and DCI-P3 settings and the lack of adjustability for some parameters in the sRGB mode. Because of this, our tests have been carried out in the Adobe RGB mode.
Performance
We set the screen to the Adobe RGB mode before carrying out our standard tests with the SpyderX Elite and Datacolor’s software, which cover the same parameters as we use for all monitor reviews. This enables us to compare its performance with other monitors we have reviewed in the past. The Advanced Analysis graphs of the individual tests are presented below.
1. Colour Gamut
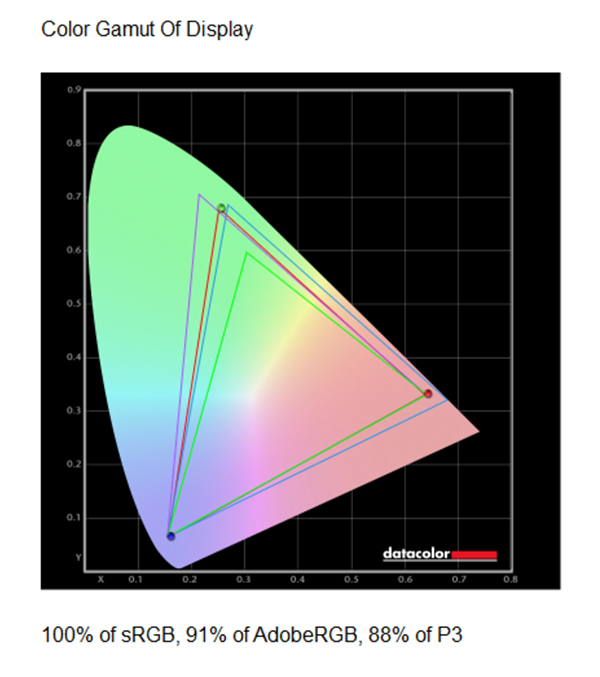
In the diagram above, the green triangle shows the boundaries of the sRGB colour space, while the purple triangle delineates the Adobe RGB colour space and the blue triangle shows the P3 colour space. The red triangle shows the measured colour space for the monitor, which covers 100% of the sRGB colour space, 91% of the Adobe RGB colour space and 88% of the DSC-P3 colour space. This is a better result than we obtained for the PA279QV.
2. Gamma

Gamma plots show the relationship between the brightness of a pixel as it appears on the screen, and the numerical value of that pixel. They are a good indicator of how mid-tones are reproduced. If gamma is set too high, mid-tones appear too dark.
The graph of the measured gamma (above) shows it to be exactly 2.2, the recommended gamma for image editing with Windows PCs; another very good result. However, the grey ramp remains as lumpy as the one we obtained from the PA279JCV indicating some unevenness in tonal rendering.
3. Colour Accuracy
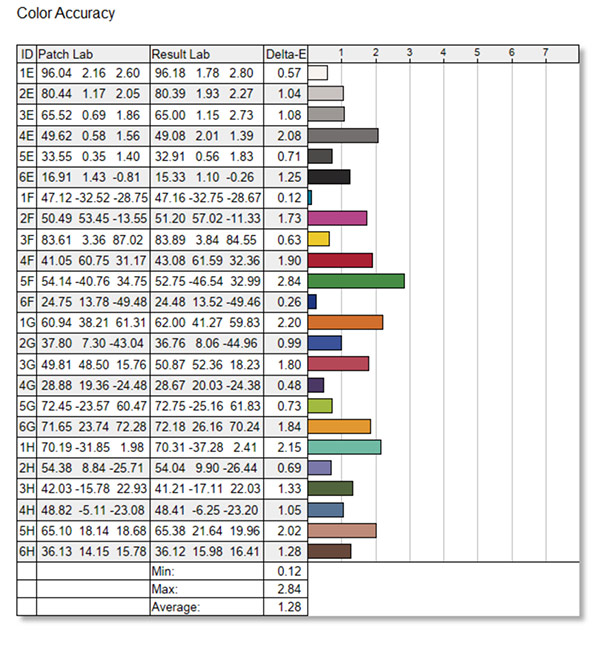
The colour accuracy showed only minor deviations from the ideal theoretical values for most of the 24 measured values. The largest deviation occurred in the green band although the overall average was significantly better than the figures obtained for the PA279JCV monitor.
4. Brightness, Contrast and White Point
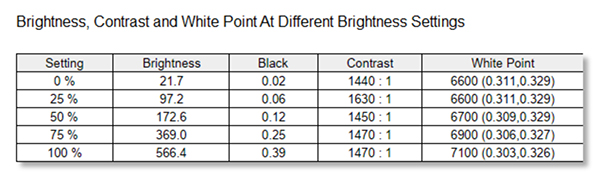
The contrast ratio results were more consistent than we found with the PA279JCV, while the white point readings showed consistent measurements right up to the maximum screen brightness, which was only slightly above the rest. Black point reading tracked slowly upwards, as expected for the increase in screen brightness settings.
5. Screen Uniformity
The two Screen Uniformity tests check the brightness and colour consistencies of the display in nine sections of the screen, at various luminance levels. Separate graphs are provided for luminance (brightness) and colour measurements across four luminance levels. We present the upper and lower graphs for each category.
5a. Luminance Uniformity
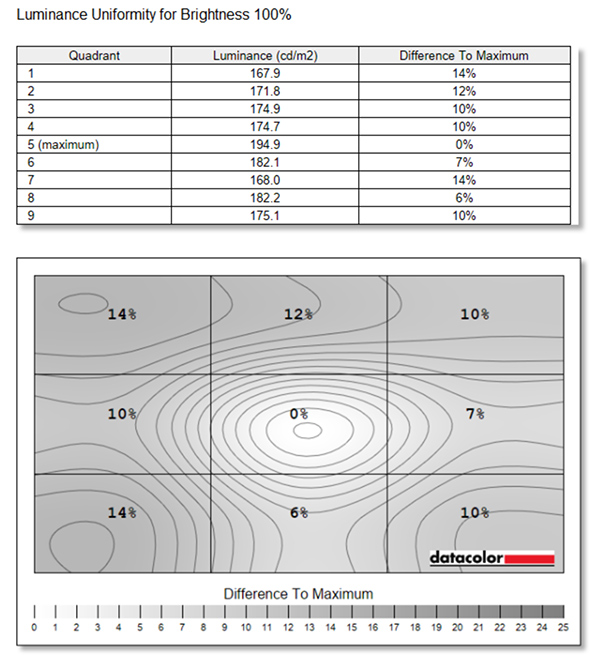
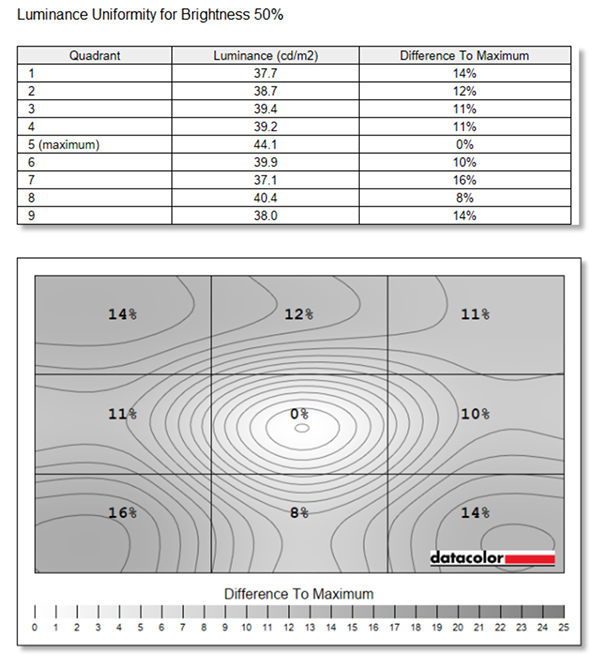
Luminance uniformity readings showed distinct hot spot in the centre of the screen, although the differences in readings between the eight peripheral areas was relatively small at both brightness levels. This is shown as a relatively poor score on the overall monitor rating.
5b. Colour Uniformity
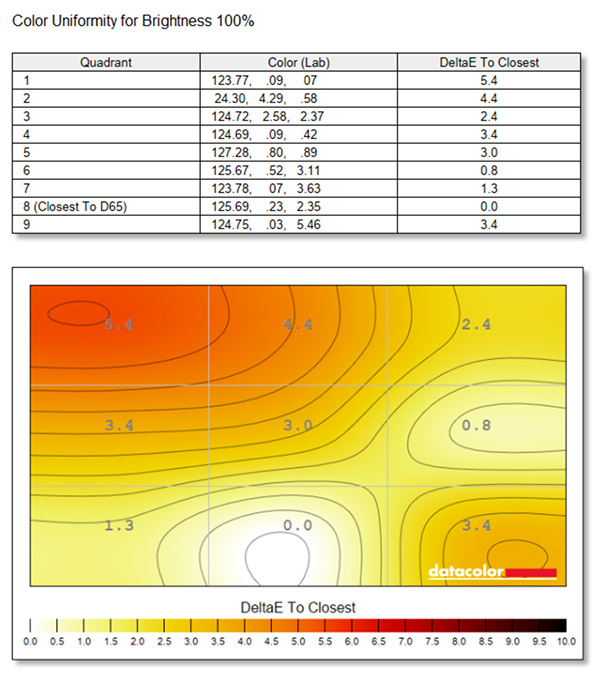
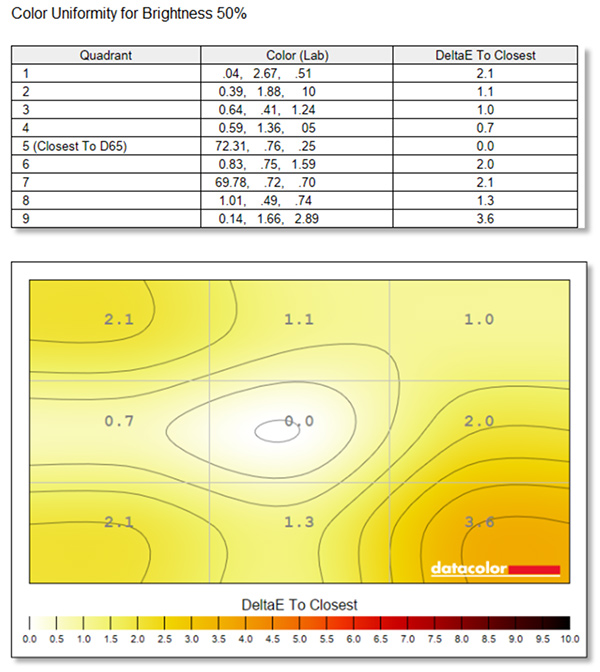
Colour uniformity measurements showed greater variations than the luminance uniformity measurements and also revealed a ‘hot spot’ in the upper left corner of the screen. The maximum uniformity occurred in the bottom centre of the screen. Uniformity was better with lower light levels than at maximum illumination, where the greatest deviation occurred in the lower right corner while the highest uniformity was in the centre of the screen.
6. Before and After Views
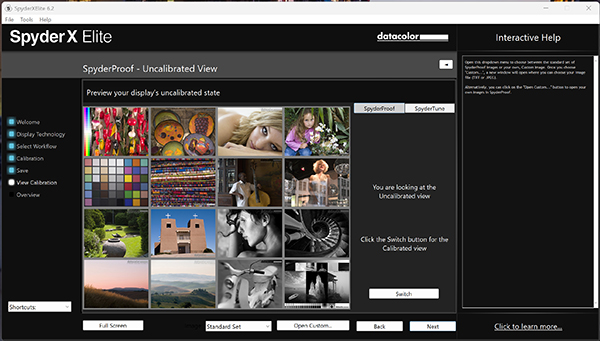
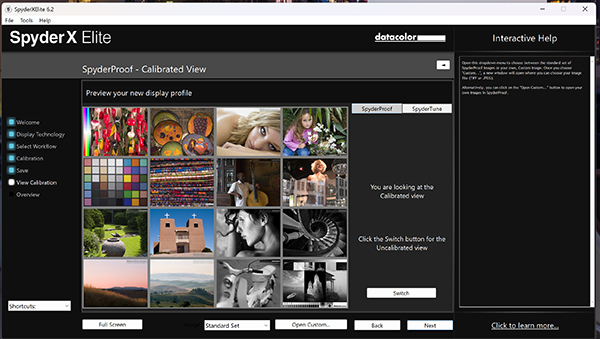
The ‘before’ (top) and ‘after’ (below) displays produced by the Spyder5 Elite showing the effects of calibration. The close similarities between these displays showed the PA27JCVships with excellent colour settings.
Overall Rating
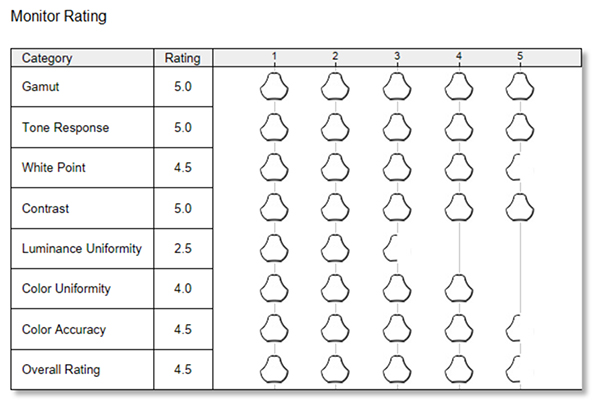
The overall rating shows the PA27JCV to be a decent performer for its price. Its main weakness is luminance uniformity, although whether it has an obvious effect on viewing quality and the ability to use the screen for editing will depend on the use to which this monitor is put.
Out of interest we also ran screen analysis tests with the DCI-P3 and Rec. 709 presets. The DCI-P3 setting reduces the screen’s brightness from 160 nits in the Adobe RGB mode to just 48 nits, which is significant dimming. The Rec. 709 mode has a fixed brightness level of 100 nits.
The overall rating scores for each of these settings are reproduced below.
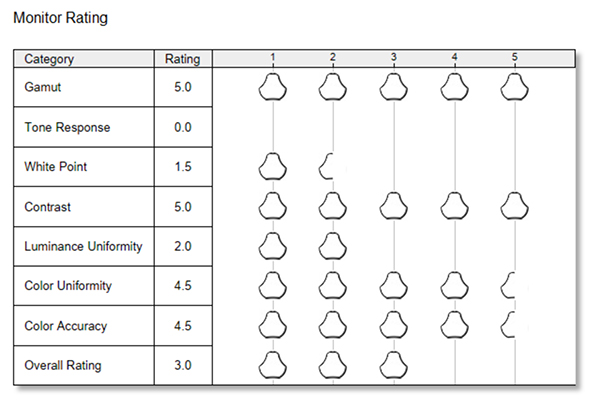
The zero score for Tone Response with the DCI-P3 colour space results from a screen gamma measurement of 2.6 , which is a significant deviation from the regular 1.8 and 2.2 stan ards.
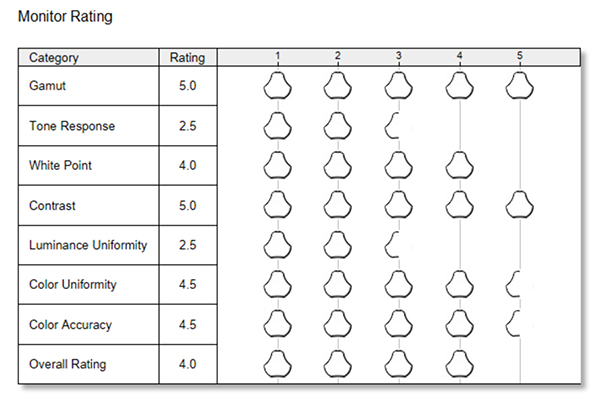
The overal ratings for the Rec. 709 colour space.
Conclusion
Login or Register to access the full article.
SPECS
Panel size: 27-inch
Aspect ratio: 16:9
Active display size (h × v): 596.74 x 335.66 mm
Panel type: IPS (flicker free) with Anti-Glare, Low-Reflection surface and LED backlight
Viewing angles: 178 degrees horizontal and vertical
Brightness: HDR, Peak = 500 cd/m2, typical = 400cd/㎡
Contrast ratio: Max = 3000:1; typical = 1500:1
Response time (typical): 5 ms (GTG)
Native resolution: 5120 x 2880 pixels
Pixel pitch: 0.116 mm
Display colours: 1073.7 million (10 bit)
HDR (High Dynamic Range) Support: HDR10
Refresh Rate (Max): 60Hz
Colour Space modes: sRGB (100%), Adobe RGB (95%), DCI-P3 (99%)
ProArt Presets: Native, sRGB, Adobe RGB, DCI-P3, Rec.2020, DICOM, Rec.709, HDR plus 2x user modes
Colour Temperature Selection: Yes (5 modes)
Gamma Adjustment: Yes (Supports Gamma 1.8/2.0/2.2/2.4/2.6 )
I/O Ports: USB-C x 1 (DP Alt Mode), DisplayPort 1.4 x 1, HDMI(v2.1) x 1, USB Hub with 3x , USB 3.2 Gen 1 Type-A, 1x USB 3.2 Gen 1 Type-C, Earphone Jack
USB-C Power Delivery: 96 W
Audio: 2Wx2 speakers
Signal Frequency: Digital Signal Frequency: 15~135 KHz (H) / 48~60 Hz (V)
Certification: Energy Star, EPEAT Gold, TÜV Flicker-free, TÜV Low Blue Light, VESA DisplayHDR 500, VESA MediaSync Display, Calman Verified, FSC MIX, Mac Compliance
Power consumption: Power On (Typical) 31.04 W, Power Saving mode: <0.5 W, Power Off mode: 0W (hard switch)
Tilt / Swivel / Pivot: Tilt = +23° ~ -5°; Swivel = +30° ~ -30°; Pivot = +90° ~ -90°
Height Adjustment: 0~130 mm
Other features: ProArt Chroma Tune, DisplayWidget Centre, Adaptive-Sync VRR Technology, PIP / PBP Technology, QuickFit Plus, Ambient Light Sensor, VESA Wall Mounting, Kensington Lock
Dimensions (w x h x d): With stand: 61.22 x 53.81 x 21.50 cm; without stand: 61.22 x 36.29 x 4.41 cm
Net weight: 5.91 kilograms (with stand)
Accessories: Colour pre-calibration report, HDMI Ultra High-Speed Cable, Microfiber cloth, Power cord, Quick start guide, USB-C cable, Warranty Card, Welcome Card
Distributor: ASUS Australia Pty Ltd
Rating
RRP: AU$1199
- Build: 8.9
- Ease of use: 8.8
- Viewing quality: 9.2
- Versatility: 9.0
BUY