How to overcome the challenges of capturing worthwhile seascapes and cloudscapes.
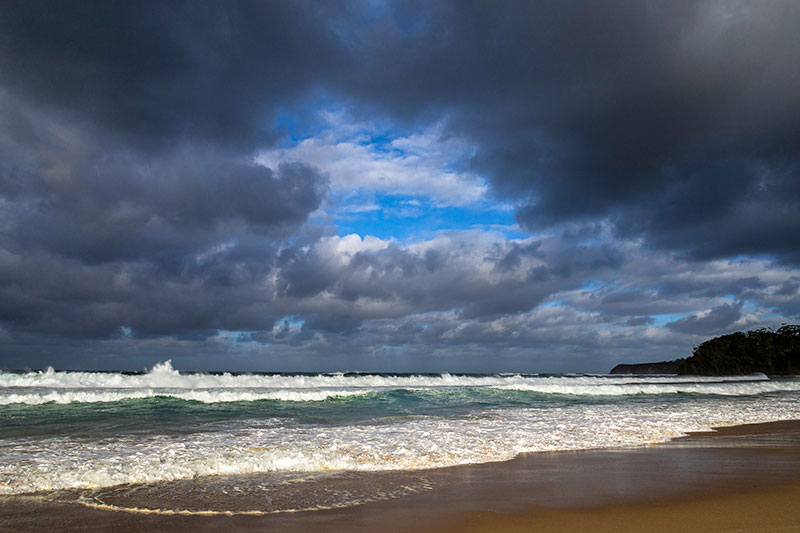
Seascapes and cloudscapes frequently occur together, which can make it difficult to decide which to prioritise. However, you can often give equal attention to both in a single image, as shown here.
Seascapes often contain clouds, although you can obtain great photographs of clouds away from the sea. Nevertheless, both genres go together as they present some similar challenges to photographers. In this article we look at the similarities and differences between them and the issues you must face in order to capture worthwhile shots.
Seascapes
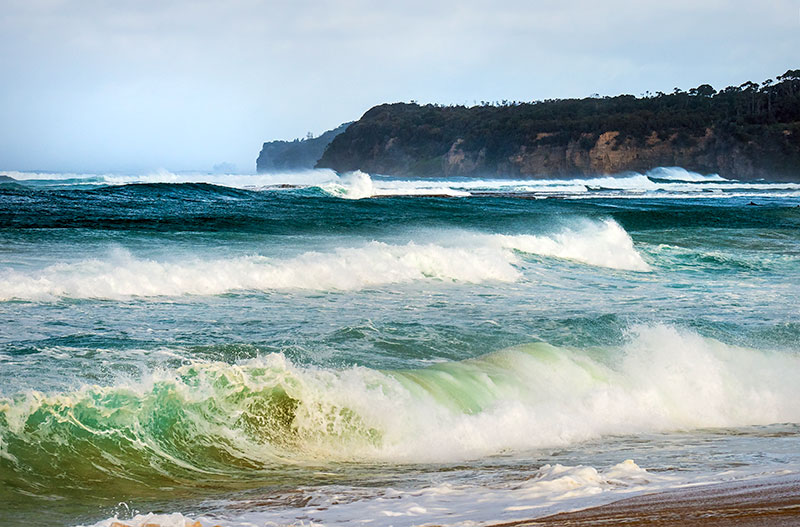
Seascapes can be tricky to get right: success often depends not just on the locations themselves but also on your timing, the weather and the ways in which you frame your shots. It can also be dangerous; involving picking your way across slippery and sharp rocks as the tide rises and the waves come closer and closer – or inching along steep cliff paths.
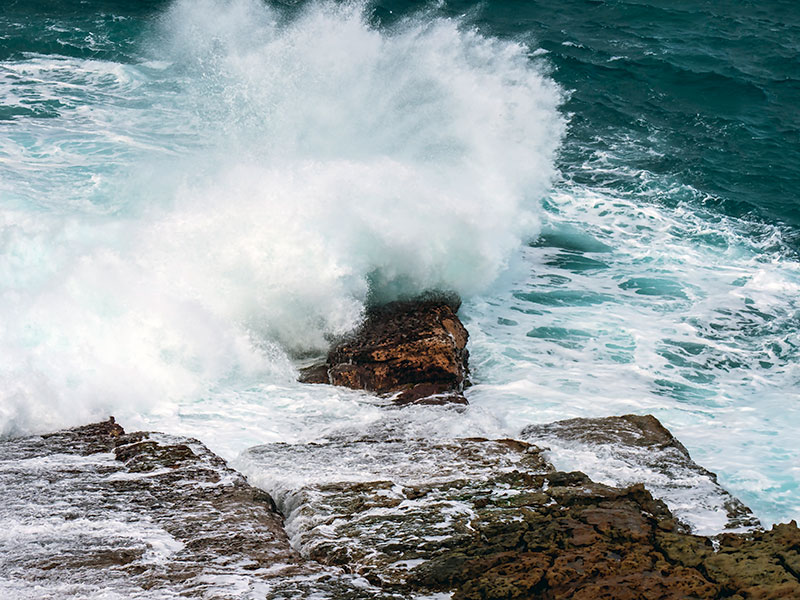
Unless you use a telephoto lens, like the 200mm lens used for this close-up of breaking waves, you risk getting swept off your feet by a freak wave if you venture onto a rock platform.
There’s also the risk of getting very wet – not only for the photographer but also the camera and related equipment, which can be disastrous unless your camera is totally waterproof (not just weather-resistant). Blown spray can also get into unsealed joints in cameras that aren’t weather-resistant. If you take proper precautions you’ll avoid such problems – especially if you plan your shoots in advance.
The following tips will help you stay safe and obtain great shots.
1. Choose your location in advance with an eye to the weather conditions.
Start by checking the tides. The Bureau of Meteorology has tide tables for every day in the year, which cover the major coastal areas in all Australian states plus the Northern Territory and Antarctica. You can find them here: www.tinyurl.com/tide-tables
There is no best tide for seascape photos. A scouting trip enables you to identify key foreground and background elements that are exposed or uncovered at different times of the day. You don’t want to scout at low tide and return with your camera as the tide is peaking only to find elements you identified as important structural elements in your shot are now submerged.
Strong onshore winds whip up spray and can flatten the tops of waves, even outside of the peak high tide times.
High tides are often associated with dramatic waves on beaches and rocky headlands, but could create strong currents and rips in some situations. Narrow channels between rocks might seem innocuous, but they can be very dangerous when the water is flowing rapidly in and out.
Low tides are good for photographing ripples in the sand and reflections of clouds in shallow, stiller water, although you still need to protect yourself and your equipment, particularly if the inflow is rapid. Make sure you have a clear exit strategy.
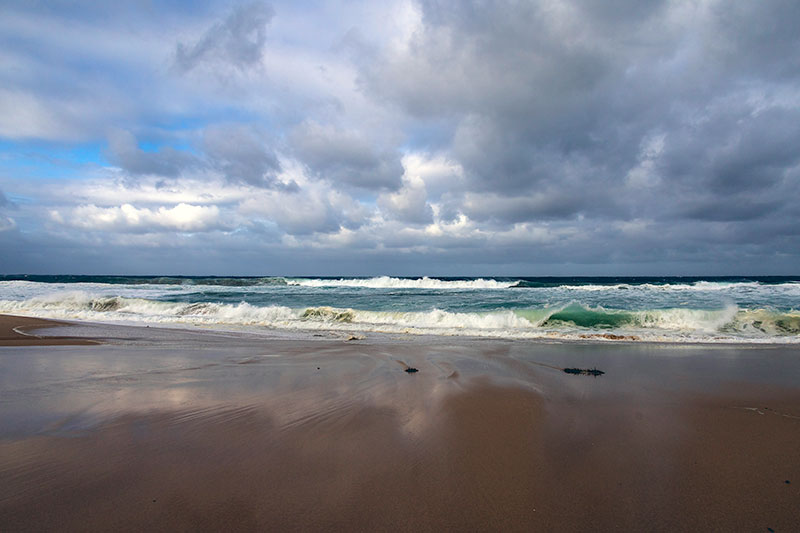
As the tide retreats it can expose ripples in the sand, cloud reflections and the tracks created by out-flowing water.
Understanding the tides is vital if you’re shooting on a rocky platform and your aim is to obtain dramatic shots of breaking waves. Wear a buoyancy vest in case a freak wave knocks you off your feet.
Always carry a phone, preferably in a waterproof housing. Wear shoes with plenty of traction and keep waterproof bags on hand to protect your camera. It’s also wise to have a companion so you can help one other, if necessary.
2. Find the right lighting.
The best times for seascape photography (and, in fact, all landscape photography) are usually the ‘golden’ hours just after sunrise and just before sunset and the ‘blue’ hours just before sunrise and just after sunset. Light is softer at these times since the sun is lower and more diffuse.
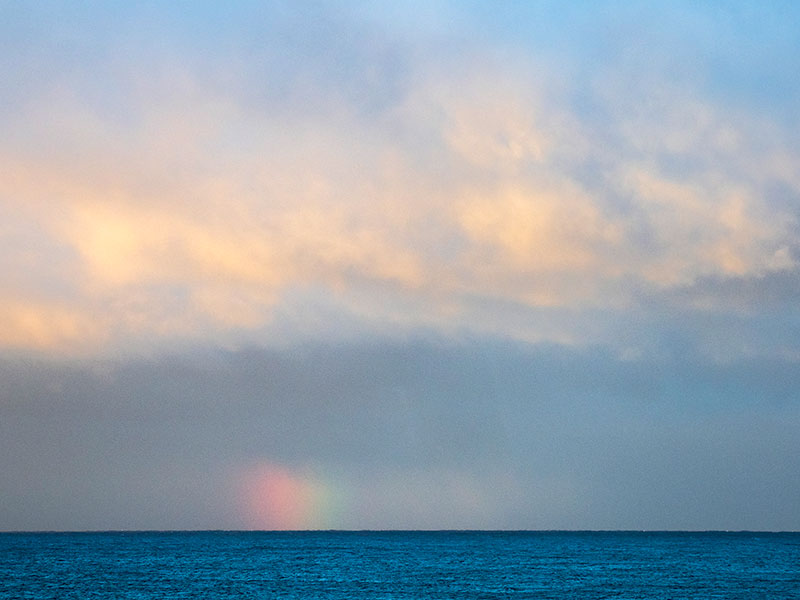
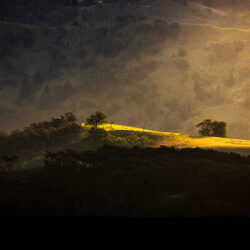
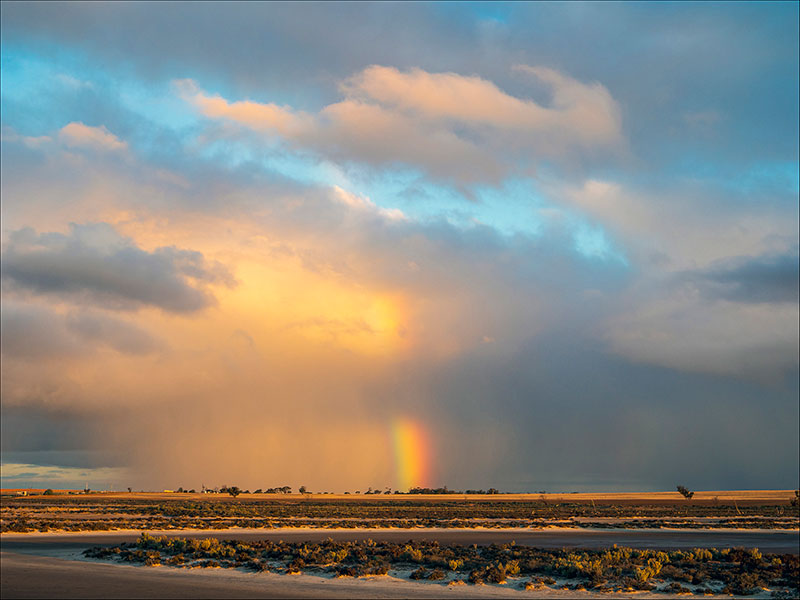
The warm glow of a winter late afternoon offsets the rainbow created by an off-shore storm. A 200mm telephoto lens was used for this shot, which was taken from a headland.
Longer shadows and different lighting angles make it easier to produce interesting compositions. Take advantage of backlighting, side lighting, silhouettes, sunbursts and lens flares. Sunsets, in particular, can cast a captivating glow over the water.
Make creative use of wet and stormy days when you can include dramatic cloud formations in the sky. Check the weather forecast a few hours before your shoot – but be prepared to quit if the conditions become too rough.
3. Be selective with camera settings.
When photographing any moving subject you have two choices: use a fast shutter speed to ‘freeze’ the motion or a slow shutter speed to blur it. Fast shutter speeds of 1/500 second or higher are required for shots of breaking waves – and you may need a higher ISO setting.
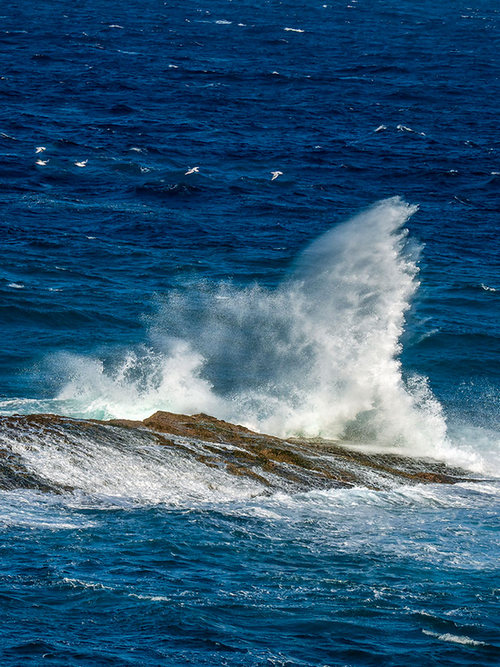
A shutter speed of 1/800 second was used, along with a 300mm telephoto lens, to freeze this breaking wave.
Slow shutter speeds with exposures of half a second or more turn moving water into a milky blur that contrasts with sharply rendered rocks and cliffs. You probably need a tripod for these shots and maybe also a neutral density (ND) filter to reduce the light reaching the image sensor.
Blurring can occur if you set up your tripod on a sandy shoreline and the legs begin to sink. It can also be caused by the wind moving the tripod on blustery days. Hang a weight from its centre post to reduce the wind’s impact.
Quick tips
– Look for foreground interest in the form of rocks and tide pools, patterns in the sand produced by wind or water, pebbles, shells, dried seaweed and other detritus on the beach. Move in close and make them a feature.
– Shoot into the light, aiming to capture highlights as they dance off the water surfaces.
– Try shooting in black and white to make strong structural; elements in the scene stand out and/or appear more atmospheric.
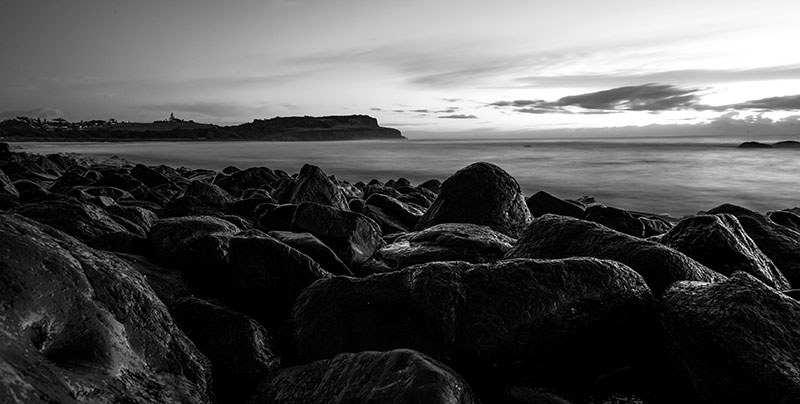
Joel Frankham of Lismore Camera House created this image with a Sony α7R Mark III full frame mirrorless camera using a 21mm wide-angle lens stopped down to f/18 for maximum depth-of-field. The long 15-second exposure rendered the sea as a soft blur, while the monochrome presentation emphasised the moody atmosphere of the scene. © Joel Frankham.
– Misty conditions also provide good opportunities for atmospheric shots.
– High vantage points provide a different perspective on the scene. If you don’t have a drone and/or access to an aircraft, cliff tops also allow a wider perspective on the scene. This is handy when clouds play a key role in the framing of the image.
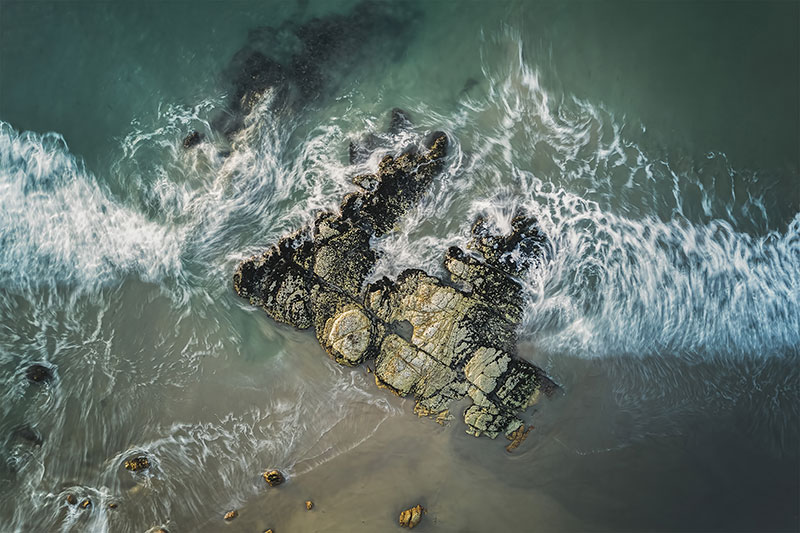
This ‘bird’s eye’ view of coastal rocks by Simon Gregory from Camera House Hobart captures a much more interesting view of the scene than would be possible from the beach. Note the use of a relatively slow shutter speed to create interesting patterns with the breaking waves. © Simon Gregory.
Photographing clouds
Meteorologists identify many types of clouds, from the common blue-skies cumulus and towering cumulonimbus clouds that presage a storm, to wispy, high-altitude cirrus and cirrocumulus clouds. They can hide the sun or reflect its light and may cover part or all of the sky.
Interesting cloud formations can turn otherwise run-of-the-mill photos into eye-catching pictures. But, like seascapes, cloudscapes can be challenging to photograph because they often contain very wide brightness ranges, which can make metering difficult.
Cloudscapes often contain wide and/or very subtle tonal ranges. Capturing raw files enables you to record a full range of hues and tones and bring out shadow details without sacrificing highlights.
Recording raw files gives you a wider range to work with than JPEGs. However, you may need to bracket exposures or take a couple of shots with different exposures to obtain the result you want. Pay attention to the following:
1. Composition: Decide on the main subject of the picture; what to include and what to leave out, and aim for it to cover roughly 75% of the frame. Sometimes the scene dictates whether you should shoot in portrait or landscape orientation; otherwise, it’s a matter of taste. Take both shots and decide when you have time to consider them. The same advice applies whenever you’re required to make other decisions.
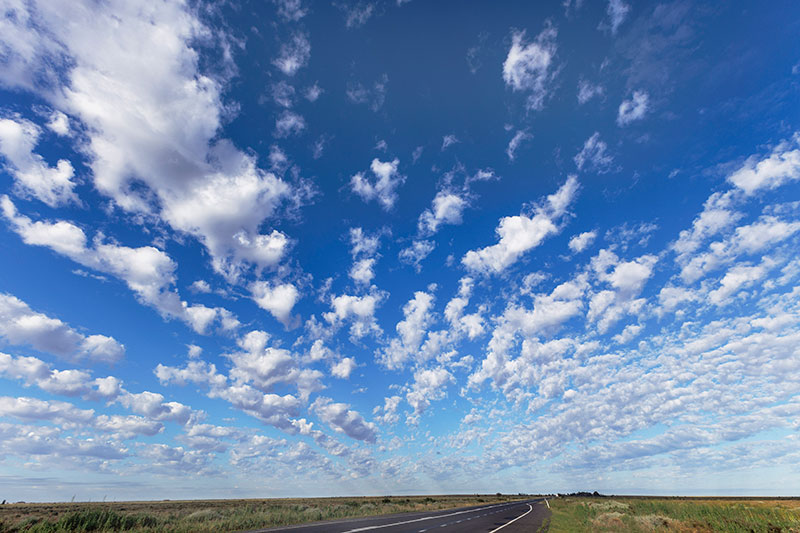
Typical blue-sky cumulus clouds in wind-driven lines, photographed when crossing the Hay Plains in Western NSW.
2. Time of day: Harsh midday light on sunny days can make metering more difficult because of its extended brightness range. Consider using an HDR (High Dynamic Range) setting at these times. Dramatic shots are possible when the sun is hidden behind a cloud – or any other object that prevents its light from directly entering the camera’s lens. Otherwise, the ‘golden hours’ around sunrise and sunset usually deliver the most satisfying results.
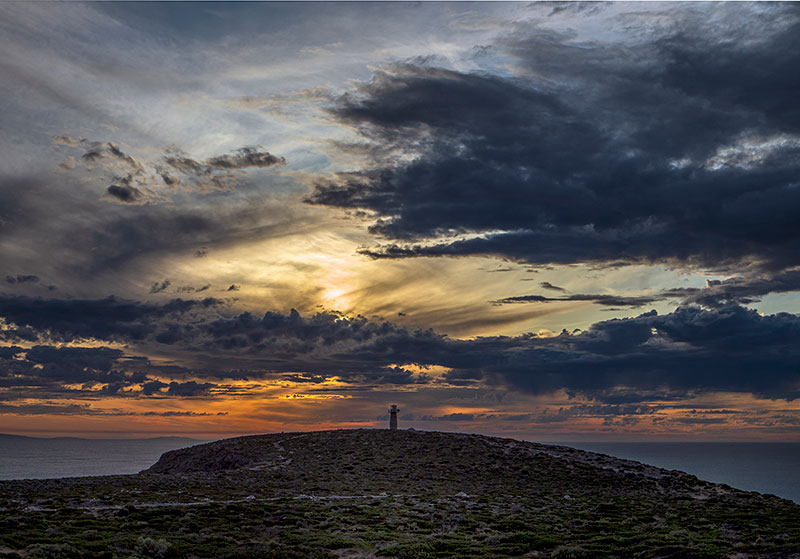
This shot was taken shortly before sunset on a day where rain was forecast; hence the dramatic clouds. Conditions like this, where the sun is behind the clouds are among the few situations where it’s safe to point your camera directly at the sun.
3. Weather: Be alert for potentially interesting weather events. Storm fronts can provide dramatic scenes with dark clouds and lightning but other weather events may be easier to photograph. Look for unusual types of lighting, such as low-level clouds, sea mist, crepuscular lighting (shafts of light through clouds) and diffraction phenomena like iridescence and rainbows.
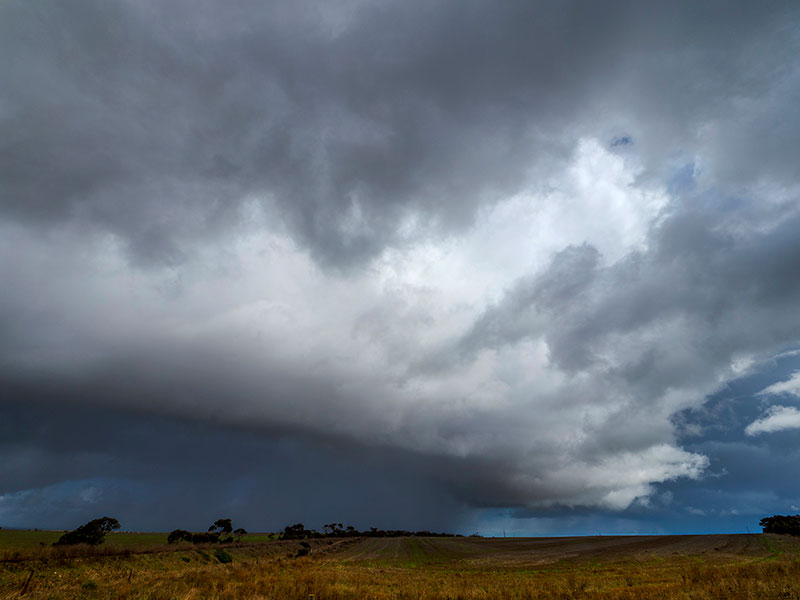
Storm fronts can sweep in with dark clouds and rain, creating dramatic skies, as in this shot taken in south-eastern South Australia.
4. Filters: Polarisers can be used to bring out clouds by partially blocking the polarised light from the blue sky to increase contrast. But they require careful adjustment. Graduated ND filters are easier to control but tend to split the field of view in half.
Some cameras include built-in graduated ND filters that are easier to control thanks to touch-based screen adjustments. If your camera lacks this feature you can still take advantage of a normal graduated ND filter by using depth-of-field previewing to set the position of the filter.
5. Other considerations: Most camera settings can be adjusted as you would for other subjects. Where possible use small lens apertures to maximise depth-of-field, balancing the ambient lighting with the aperture setting.
Keep ISO values low enough to minimise image noise and never point your camera directly at the sun; the intensity of direct sunlight can damage the sensor – and your eye when you look through the viewfinder. Take plenty of shots; clouds are ephemeral and constantly changing.
Useful links
This article by Margaret Brown is an excerpt from Landscape Photography 2nd Edn
Pocket guide Partners: Camera House and Sony
![]()
![]()