How to ensure correct exposure and focus when your subject is moving quickly against a changing background, especially in scenes with wide brightness ranges.
There’s no point in having the lens focused on the subject if exposure settings mean it will be too dark or too pale for details to be recorded. Most modern cameras link AF and exposure modes by default so, if your subject is in focus, it should also be correctly exposed.
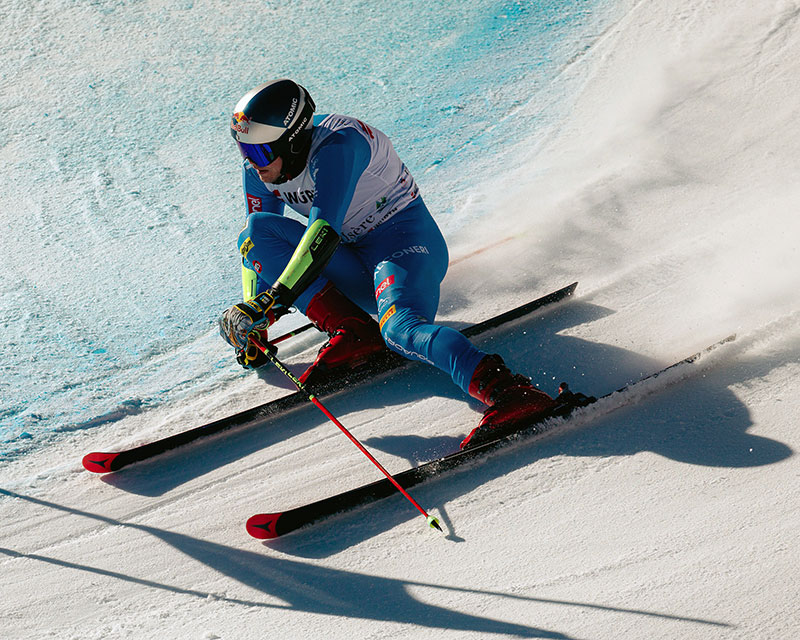
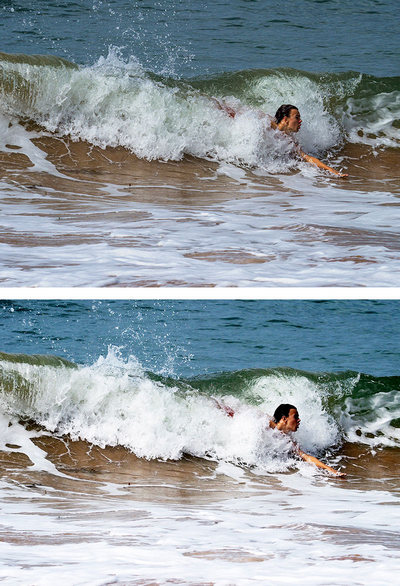
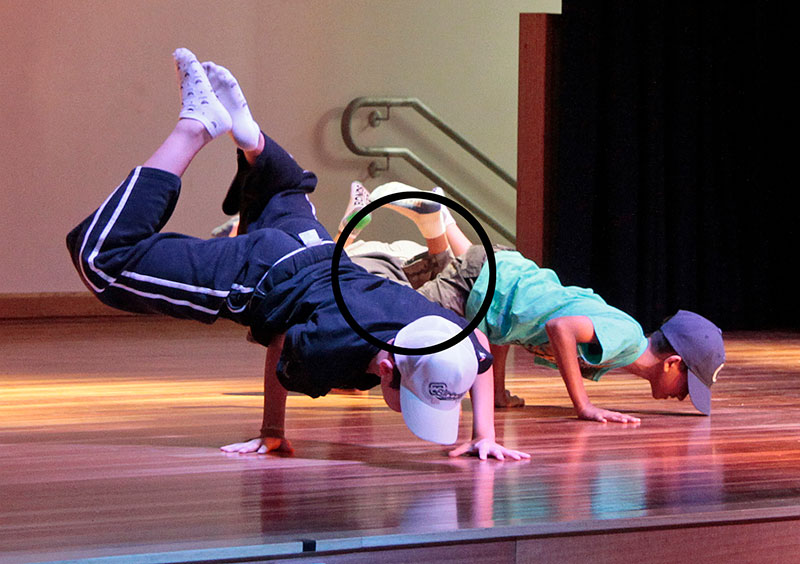
It can be difficult to ensure your subject remains correctly exposed and in focus when it is moving quickly against a background with changing brightness levels – particularly in scenes with the wide brightness ranges you find when photographing winter sports. © Alex Moysan.
Unfortunately, with sports and action photography you’ll find sometimes it isn’t, particularly where you’re shooting fast-moving targets. Dealing with the brightness range of the scene can also present problems, particularly on a bright, sunny day.
Problems occur when your main subject is silhouetted against a bright background or recorded with washed-out details when the background is much darker. This article offers advice to help you avoid situations like these.
Dynamic range factors
Dynamic range describes the range of tones from the darkest to the brightest parts in a scene. In most outdoor environments it’s slightly greater than human eyes encompass – but much wider than most cameras can handle, as shown in the diagram here.
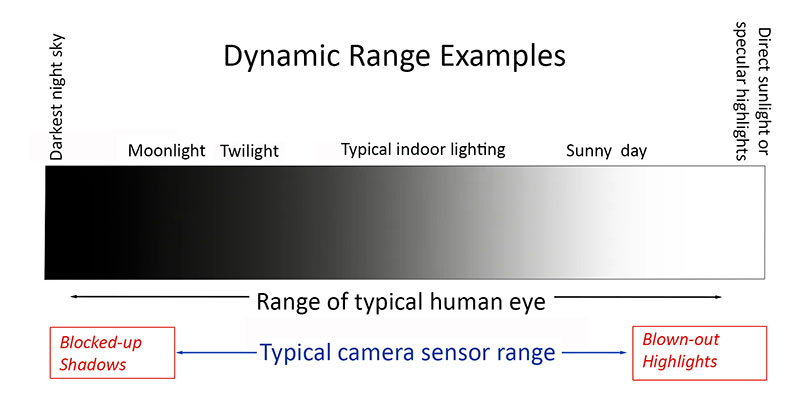
This illustration shows typical dynamic ranges for human vision and camera sensors, compared with the real-life brightness range we experience.
Cameras with large sensors generally record the widest dynamic range. Smartphone and compact camera sensors, being much smaller, require additional processing applied to JPEG files, either in the camera or post-capture.
Many cameras also have special settings for increasing the recorded dynamic range. Some also offer dedicated, multi-shot HDR modes that combine a set of exposures at varying exposure levels.
Canon’s dynamic range settings include Auto Lighting Optimiser (ALO) and Highlight Tone Priority (HTP) to preserve detail in bright areas.
Fujifilm provides selectable Dynamic Range (DR) settings (DR100%, DR200%, DR400%, Auto), which adjust ISO sensitivity to underexpose bright areas and lift deep shadows.
Nikon has similar settings to Canon with four Active D-Lighting (ADL) settings (Low, Normal, High and Auto).
OM System (Olympus) cameras provide user-adjustable functions like Highlight & Shadow Control.
Pentax provides in-camera Highlight Correction and Shadow Correction functions.
Sony cameras have a Dynamic Range Optimiser (DRO) function for adjusting shadows and highlights in JPEGs, which provides adjustment levels from Auto to 5.
Log profiles are commonly used for video recording and some manufacturers provide ‘flat’ picture profiles, which reduce contrast, sharpness and saturation in order to capture more detail in highlights and shadows.
This pair of images shows the difference in the range of tones recorded in a raw file (top) and a JPEG (below), captured simultaneously in very contrasty lighting.
When shooting stills, recording images as raw files will capture a wider range of tones across the scene’s brightness range. The more tones the file contains, the better able you are to bring out recorded details in both highlights and shadows. That’s why it’s worth using high-bit-depth files for scenes with wide brightness ranges.
Some recent cameras provide a HEIF (High Efficiency Image Format) alternative to JPEG for stills. This has a higher, 10-bit depth than 8-bit JPEGs, which means it can record a wider range of tones, although it’s not as wide as raw files, which are typically 12-bit or 14-bit. The table below compares the tonal depths that can be achieved at different bit depths.
| Bit depth | No. of tones recorded per channel (red/green/blue) | Total tones recorded |
| 8-bit (JPEG) | 256 | 16.7 million |
| 10-bit (HEIF) | 1,024 | 1.07 billion |
| 12-bit (RAW) | 4,096 | 68.7 billion |
| 14-bit (RAW) | 16,384 | 4,398 trillion |
| 16-bit (TIFF/Advanced RAW) | 65,536 | 281,474 trillion |
Exposure modes
Avoid the Full Auto setting when taking sports photographs because it takes away your ability to control key camera settings. Instead, use any of the following shooting modes if you want the best results.
The easiest is the ‘P’ mode, which stands for Programmed auto exposure. This setting automatically sets both lens aperture and shutter speed but, unlike the full auto mode, doesn’t stop you from changing other parameters so you can easily make further adjustments.
The ‘A’ mode stands for Aperture priority auto exposure; you set the lens aperture, while the camera determines the shutter speed. As with the P mode, other parameters remain adjustable. Aperture adjustments allow you to control how much depth in the scene remains sharp.
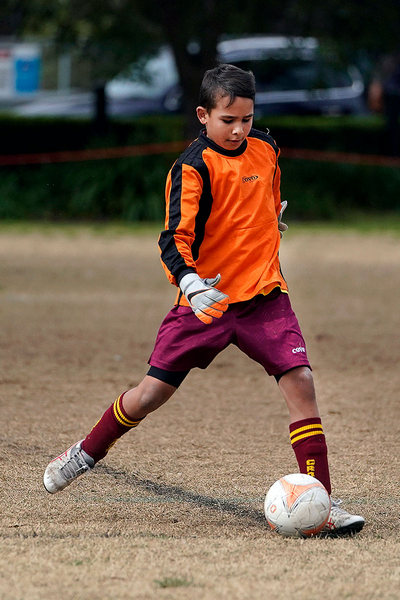
This shot was taken in Aperture priority AE mode using a wide lens aperture of f/2.8 to blur the background while keeping the subject sharply focused. A long focal length of 200mm provided good separation between the subject and the background.
Wide aperture settings – indicated by the smallest f-number – let you blur out distracting backgrounds and support fast shutter speeds. However, it’s best to stop the aperture down to f/8 or smaller for a greater depth-of-field in ‘establishing’ shots showing the venue.
In the ‘S’ mode, you control shutter speeds and can decide between using a fast shutter speed to ‘freeze’ action or a slow one to get shots showing motion blurring. You may need a tripod when using shutter speeds of a second or more.
In Manual mode, which is marked by an ‘M’, you must control all the settings. You should only use it when you have a particular objective in mind. On the downside, it requires constant readjustments.
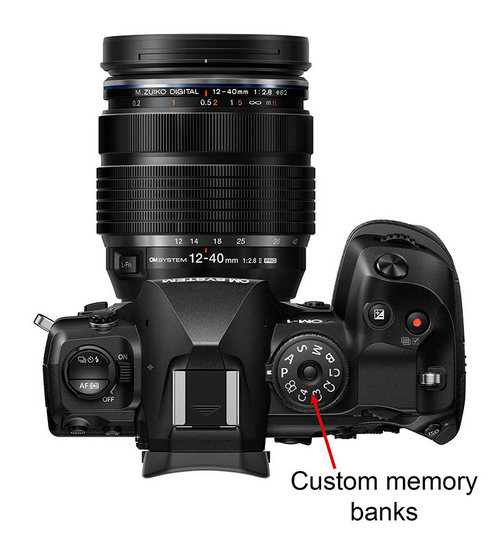
Custom memory banks on the mode dial of a flagship Micro Four Thirds system camera. (Source: OM Digital Solutions.)
Some manufacturers add Custom memory banks (shown on the mode dial by the letter ‘C’ plus a number). These let you store combinations of camera settings you use a lot so they are quick to access when you need them. Many also provide a ‘B’ (‘bulb’) mode that sets up the camera for very long exposures outside of the default shutter speed range.
Other modes you might find are dedicated movie modes, scene pre-set modes and filter modes that access a library of pre-programmed special effects. Your camera’s user manual outlines what’s available.
Metering modes
All modern cameras have integrated light meters to measure the light reflected from the scene.
Most cameras’ meters use one of three metering patterns:
1. Evaluative, Matrix or Multi-pattern metering splits the frame into a series of ‘zones’, which are analysed to detect the balance of dark and light tones. This mode is ideal in scenes with a wide range of tones, such as those containing large areas of bright sky. Some cameras also measure colour, subject distances, highlights and shadows and many also use focusing information to prioritise the area you focused on.
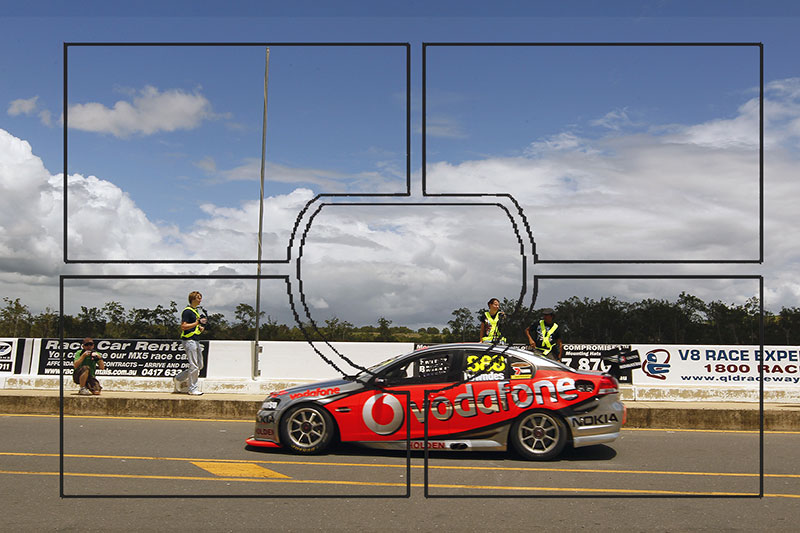
Evaluative metering usually gives well-balanced exposures in scenes like this where there is a large area of bright sky.
Most cameras default to multi-pattern metering because it works well for many subjects and takes account of differences between a bright sky and darker foreground. But it doesn’t necessarily ensure you’ll get the best results.
2. Centre-weighted average metering prioritises measurements from the centre of the frame, largely ignoring the corners. It’s useful when subjects are in the middle of the frame and can work well for sports action.
Centre-weighted average metering places greater importance on measurements from the centre of the frame. It works best in scenes with relatively even lighting when subjects occupy most of the frame and are centrally positioned.
3. Spot metering only measures roughly 2% of the frame around the focus point, ignoring everything else. Canon cameras include a Partial metering mode that measures roughly 6% of the frame. Both modes are ideal for shooting backlit subjects and worth using for photographing sports action.

Spot metering is great for obtaining correct exposures for subjects photographed against very bright or very dark backgrounds.
Many cameras also provide a Highlight priority metering mode, which is designed to prevent the brighter areas from being over-exposed. It’s usually indicated by an icon like the spot metering icon but with a star beside it. Use it carefully as it may cause the rest of the scene to be under-exposed.
You can manually over-ride the exposure settings with exposure compensation, which is outlined below.
Exposure compensation
Sometimes the camera’s settings get you close to the exposure you want, but there are times when it’s not quite right; either too light or too dark. Your camera’s histogram display, which maps the tones in the scene against the sensor’s recording range, can help you check exposures. It’s usually found in the Display sub-menu.
When the scene is evenly-lit, the graph should be fairly even across the base line. For dark scenes, the tonal peaks will be clustered to the left of the graph, while in light and bright scenes the tones are recorded towards the right-hand end.
Histograms where the peaks rise up along the left or right hand ends of the baseline indicate dark and light tones that won’t be recorded. That’s when to use your camera’s exposure compensation control (often indicated by a ± icon).
Moving in the + direction increases the brightness of the picture, while the – direction makes the picture darker. In each case, the increments are subtle – only 1/3 of a stop.
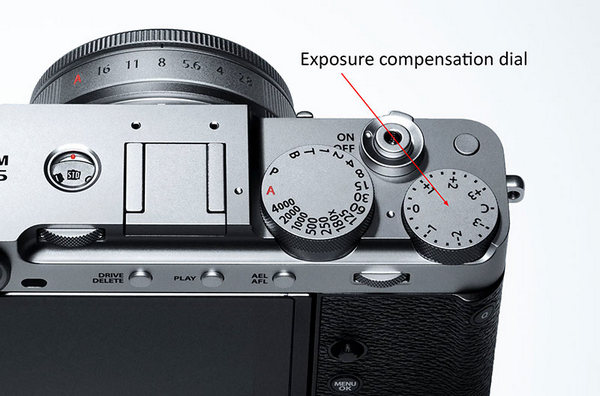
The exposure compensation dial on this Fujifilm camera is indicated by the red arrow. (Source: Fujifilm.
If the exposure compensation control is a dial or button on the camera’s body it won’t necessarily reset to zero when the camera is turned off. Always check the status of this function at the start of each new shooting session.
Shooting angles
Work out the best shooting angles to use for different situations. High viewpoints are best for showing the arena as a whole and indicating the scale and intensity of the game. Some sports photographers use camera-mounted drones for birds-eye views. (Always ask the organisers’ permission before doing this.)
Low shooting angles make athletes look larger and more imposing. You can eliminate cluttered backgrounds by showing performers against a clear sky, use a long telephoto lens to blur the background and also dramatise jumping shots in basketball, netball, volleyball and football. Low angles are also good for recording action near the ground in football tackles and soccer.
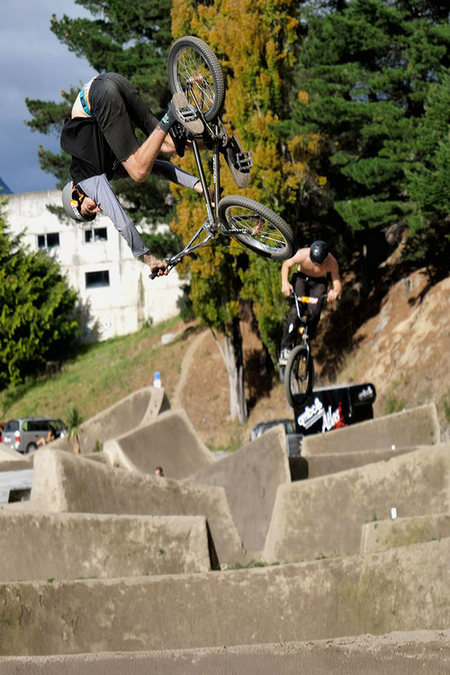
A low shooting angle can emphasise the athleticism in sports like Freestyle BMX, where you’ll need a telephoto lens to get usable close-ups from the sidelines.
In most cases you’ll be restricted to shooting from the sidelines which can provide opportunities to photograph interactions that are integral to the sport but often unseen. Look also for interactions between players waiting for their turn to bat, coaches on the sidelines and organisers preparing half-time drinks.
Finally, remember that moving subjects can pass quickly between shady areas and sunlight, so your exposure settings should be able to change to reflect different brightness levels. In the P, A and S shooting modes, if you’ve set the right exposure metering pattern, this adjustment should take place automatically.
Useful links
This article by Margaret Brown is an excerpt from Sports Photography pocket guide
Pocket guide Partners: Camera House and Lexar
![]()
![]()