Black and white photographs can stand out in a world that’s awash with colour – but which subjects work best and should you set your camera to monochrome mode?
There are plenty of reasons for presenting images in black and white (B&W) and, with modern cameras, it’s very easy to record monochrome photos and videos. Without potentially distracting colours to deal with a B&W image forces viewers to engage more deeply with the arrangements of shapes, tones and overall composition of the image.
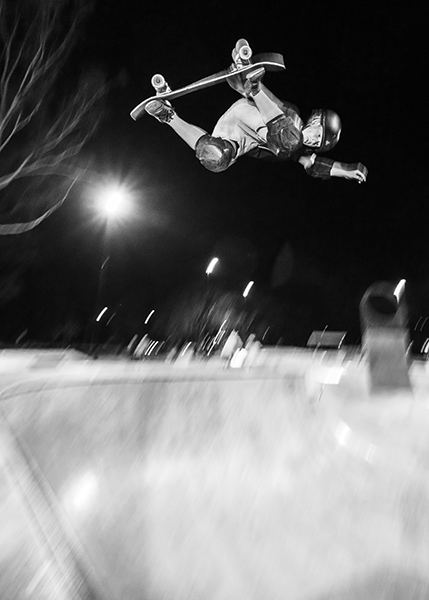
We’re accustomed to seeing sports photographed in full colour but reducing it to monochrome makes you more aware of structures in the image and the photographer’s use of light and shadow. © Locky Cooper, Camera House, Lismore.
Black and white images have a classic, enduring quality that can make them seem more ‘artistic’, graphically designed and intentional than coloured images. Lines, patterns and textures gain more importance and the viewer’s attention is drawn to the use of light and shadow in the composition.
As a result, this genre creates a more intimate connection with the viewer, which is why B&W photography is often described as ‘photographing the soul’ rather than just the surface.
How to go about it
Only two camera manufacturers currently produce enthusiast/professional standard monochrome cameras: Leica and Ricoh Imaging (which markets under the Pentax and Ricoh brands). Leica is the market leader, with several generations of cameras designed exclusively for black-and-white photography. Ricoh sells monochrome versions of the Pentax K-3 Mark III DSLR camera and Ricoh GR IV compact camera, each with APS-C sized sensors.
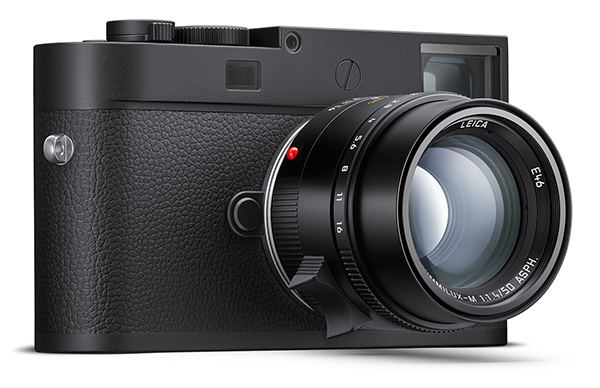
Leica’s M11 Monochrom is a luxury interchangeable-lens, full-frame rangefinder camera dedicated to B&W photography. It has a 60-megapixel BSI CMOS sensor and three raw or JPEG resolution options – 60MP, 36MP, 18MP. (Source: Leica Camera.)
Fortunately, most cameras with RGB sensors can also be used for monochrome recording and many provide special monochrome shooting modes. Here’s where to find the options available in the shooting menu for each manufacturer:
Canon: Picture Style
Fujifilm: Film Simulation
Nikon: Picture Control
OM Systems: Picture Mode
Panasonic: Photo Style
Pentax/Ricoh: Custom Image
Sigma: Colour Mode
Sony: Creative Style
Most cameras also provide settings for customising these modes in different ways using adjustments to contrast, sharpness, highlight and shadows tonality and adding granularity and/or filter effects.
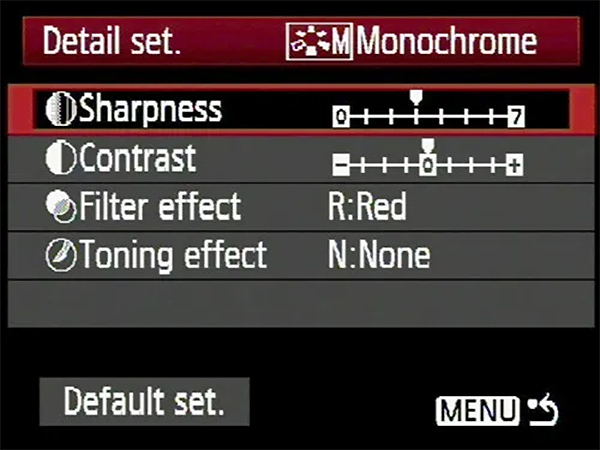
Adjustments provided in the Monochrome mode in a Canon camera’s Picture Style sub-menu.
One benefit of switching your camera to monochrome mode it to let you see your subjects in black and white as you frame each shot. This lets you visualise how the end result will appear.
What happens in the camera?
It’s important to understand that selecting a monochrome shooting mode discards all colour information and records the image in tones that range between bright white and deep black. This look is ‘baked into’ JPEGs and cannot be reversed.
That’s why you should always record RAW + JPEG images because the colour data is only preserved in the raw file. This gives you the flexibility to convert back to colour – and also make more adjustments to the B&W ‘look’ of the image – when you process your shots.
Shooting tips
If your camera supports raw file capture (most do), always set the image Quality to record RAW+JPEG. The raw file will contain all of the tonality and dynamic range the sensor can capture and give you much greater flexibility to bring out shadow and highlight details and also explore different editing treatments. You’ll be able to utilise all this data when you apply monochrome conversion, as shown in the screen grab below.
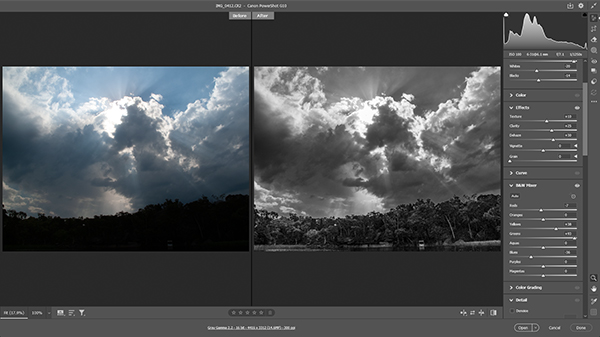
This screen grab shows how much more of the recorded image you can extract from a raw file, when converting it into monochrome, regardless of what camera you use. The original raw file used here came from a Canon PowerShot G10 camera, which was released in 2008 and has a 14.7-megapixel, 7.6 x 5.7 mm CCD sensor.
The following tips will help you to select scenes that should look good in B&W:
1. Focus on the lighting. Look for scenes with directional lighting – side light or backlighting – and use the contrasts between the light and dark tones to frame the shot. Shadows and highlights will define your subjects so use them to create the effects you’re looking for.
2. Simplify the composition, using leading lines and contrasting backgrounds and foregrounds to direct the viewer’s eyes withing the frame. Use the light to produce tonal transitions that create depth and drama and emphasise shapes, contrast and texture.

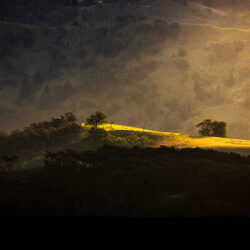
Scenes like this one, which contains leading lines, tonal contrasts and contrasting textures are ideal for presenting in B&W because they focus the viewer’s attention on the structural elements in the shot.
3. Watch out for distracting hotspots produced by specular reflections off shiny surfaces, such as water, glass or polished metals. Large highlights are distracting and can spoil your shot; although tiny highlights can enhance some compositions.
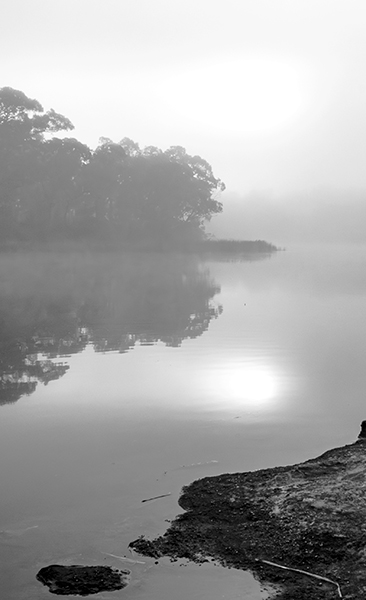
Shiny surfaces like the still water in this early morning shot will often create specular reflections that can distract the viewer’s attention from the rest of the scene.
4. Dynamic range is really important for B&W images because they are dependent on how tones are recorded. Recording the full range of tones from deep blacks to bright whites can make or break an image. Viewers will feel uneasy if they can’t discern the edges between adjacent tones in the design elements in the scene.
5. Check your camera’s histogram to ensure good tonal distribution. If the graph peaks at either end of the tonal scale you can be sure tones are ‘clipped’. Change to Spot or Highlight-Weighted metering in high-contrast scenes so the camera will calculate the exposure based on the brightest part of the scene rather than the average. Keep your ISO a little above the default base setting (usually ISO 100) to maximise the dynamic range.
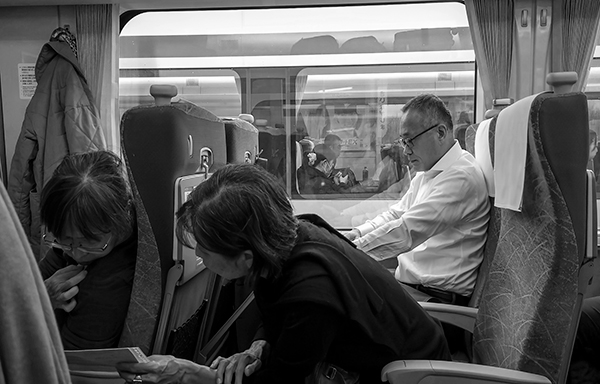
We’re all accustomed to seeing documentary photographs in B&W, which is ideal for this candid shot, taken in a train with a smartphone camera. Note how well the full range of tones has been recorded and how easy it is to distinguish one part of the scene from another and ‘tell a story’ about the picture.
In-camera adjustments
Many cameras provide additional in-camera adjustments for you to use when fine-tuning your shots. The most common are sharpness, contrast, saturation and hue (colour), although the last two are seldom supported in monochrome mode.
These in-camera functions are only applied to JPEGs. Raw files can be fine-tuned more precisely when you’re processing them and converting them into editable and printable formats.
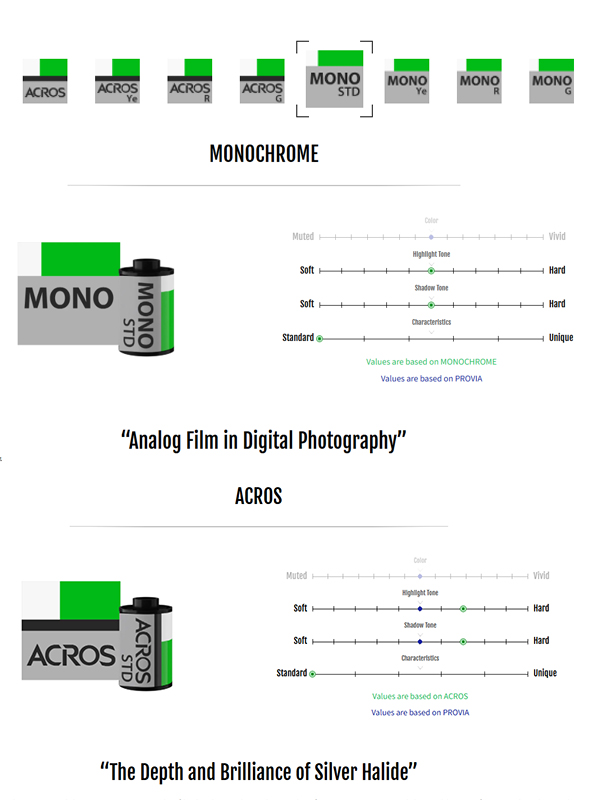
Fujifilm’s selection of Film Simulation settings includes two distinct groups of B&W ‘filters’: ACROS, which. emulate classic black-and-white film with deep blacks, and grain that intensifies with ISO and Monochrome, which imparts a softer black-and-white look and is better for portraits or scenes with subtle tonality. Note: these adjustments are only applied to JPEG files.
Be wary about using the sharpening tool when you’re shooting JPEGs as the camera has already applied some sharpening by default. It’s very easy to over-sharpen JEPGs and create halo-like artefacts. These are often difficult to see on the camera’s small, relatively low-resolution screen.
Increasing contrast in-camera can give you a preview that will make it easier to visualise how the scene converts to black and white. However, it must be done with care when working on JPEGs, as it’s easy to go too far and you won’t be able to pull back any lost shadow or highlight detail when editing your shots.
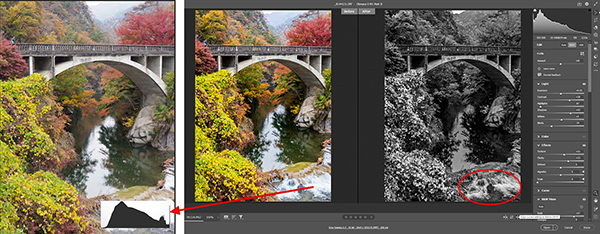
This illustration can give you some idea of how your camera’s histogram display can guide you when evaluating exposure levels. The ‘After’ image to the right of the screen grab shows how details can be recovered from highlights that were clipped in a JPEG (indicated by the red arrow) when you edit a raw file.
Interestingly, the histogram and highlight alert displayed on the camera’s screen are actually generated from the JPEG preview. If you increase contrast when shooting RAW+JPEG files, your camera may show the highlights are clipped, when the detail is actually there in the raw file. You more you increase the contrast, the more likely this is to happen.
Filter effects
Back in the days of film, black and white photographers would use coloured filters to alter the tonal balances of their black and white images. The most popular filters were yellow and red, largely because these colours could be used to make pale blue darker in order to bring out the white clouds.
Using coloured filters requires you to understand a simple principle: a coloured filter will make anything in the image reflecting that colour appear lighter, while everything that is the opposite colour will appear darker. For example, a red filter will make red roofs, fire engines and traffic lights look lighter, while anything blue, such as the sky, will appear darker.
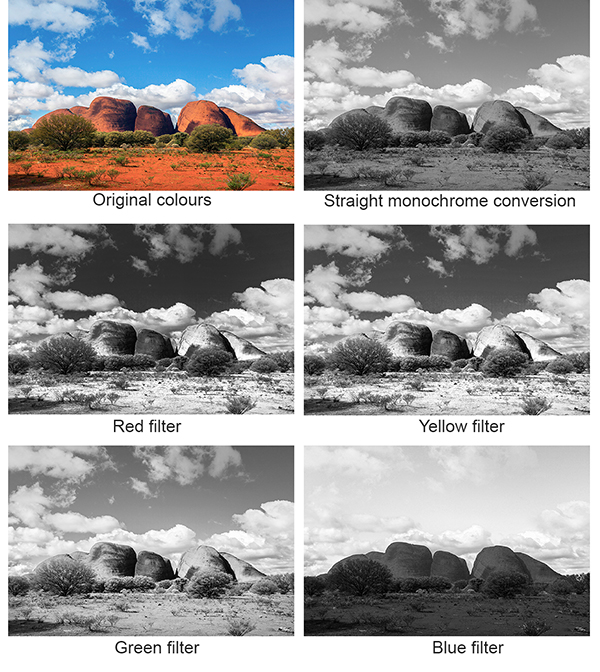
These illustrations demonstrate the effects of different coloured filters.
These effects are simulated by the filter settings in a digital camera. A red filter will record blue skies as very dark, which can be useful if you want to create a dramatic effect and bring out white clouds. An orange filter has a similar effect, although its effect is not as dark as the red filter.
Yellow filters can be used to darken blue skies a little and also lighten skin tones, and provide subtle emphasis to freckles. Green filters make anything green lighter and are often used to lift these tones photos containing large areas of grass or vegetation. Some cameras let you add colour tints to monochrome images, with sepia, blue, green and purple being among the most common options.
Special effects filters may also be provided, allowing you to simulate image grain effects with adjustments to the size of the ‘grains’ and the perceived ‘roughness’ of their distribution. Many of these effects are better left for post-processing, particularly during raw file conversion in your favourite image editor.
Conclusion
As you can see from the information we’ve provided, you will usually obtain better results if you work with raw files because they record all the image data the sensor collects and give you the widest possible range of editing adjustments to work with post-capture. When you set your camera to any of the monochrome modes it provides, remember to also set image Quality to record RAW+JPEG files.
That way you’ll get the best of both worlds, B&W JPEG thumbnails that display the end result in the camera’s viewing screens plus full-colour raw files for you to edit in any way you choose. You can save copies of different edits for different end uses, whether you want to share your creations online or print them for display or archiving.
Article by Margaret Brown
See Margaret’s Photo Review photography guides