

In summary
Lenses like this have specific limitations that make them highly specialised. Everyday photographers who don’t need the precise controls offered by the FFII TS 55mm f/2.8 lens would generally be better off buying a standard 55mm macro lens if they simply required close-up shots.
The Laowa FFII TS 55mm f/2.8 lens comes into its own when high precision is required.
Full review
Tilt/shift lenses have been around on view cameras since the early days of photography but were introduced to 35mm film cameras in the early 1960s, so they’re not exactly new. Chinese manufacturer, Venus Optics, released its first Laowa-branded lens, the 15mm f/4.5 Zero-D Shift, which only had a shift function back in 2020, following up with the 20mm f/4 Zero-D Shift lens in 2022. Now it has announced two dedicated macro lenses with both tilt and shift controls, the FFII TS 55mm f/2.8 and FFII TS 100mm f/2.8 1:1 tilt-shift macro lenses. This review will look at the first mentioned, with a review of the 100mm following shortly after.
Angled view of the Laowa 55mm f/2.8 Tilt-Shift 1X Macro lens. (Source: Venus Optics.)
Both lenses are being offered with mounts for the most popular full-frame mirrorless camera systems, including Sony E, Canon RF, Nikon Z, Fuji GFX and Hasselblad XCD. So far, cropped sensor formats are not being covered, although Venus Optics is an innovative manufacturer and may come to the party at some time in the future. The review samples we received had the Sony E mount and we have reviewed them on the Sony α7 II camera.
Tilt/Shift Lenses Explained
Tilt-shift lenses are highly specialised and used to control perspective, correct distortion and creatively control depth of field. They’re commonly used for architectural photography, some types of landscape shots (including recreating a ‘miniature’ effect) and product photography.
These lenses are articulated so part of their barrels can be moved in four directions: an up/down tilt of the front section for controlling the plane of focus and a side-to-side shift of the rear section to correct converging verticals (usually in buildings). For these reasons, tilt/shift lenses are also known as Perspective Correction or Perspective Control (PC) lenses.
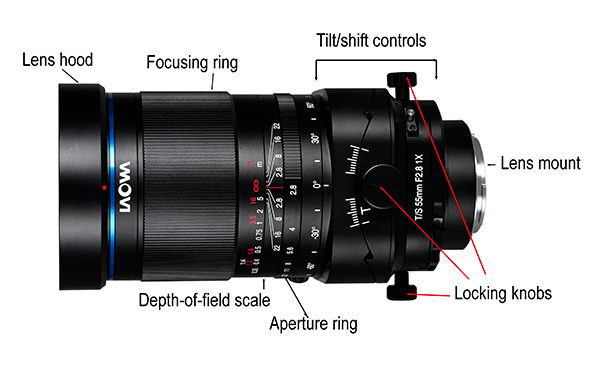
This annotated illustration shows the various parts of the lens.(Source: Venus Optics.)
It takes a lot of trial-and-error to get these adjustments right and it can help if you understand the Scheimpflug principle that underpins the technology. You can read all about it here.
It’s also useful to know that your camera’s metering system can find it tricky to set correct exposures when these adjustments are used so, if you plan to use internal metering you should make the measurements before you start to adjust tilt and/or shift. Make sure you use your camera’s focusing aids – particularly magnification and focus peaking – to check both focus and depth-of-field when working with these lenses; it’s easy to end up with slightly out-of-focus areas in scenes when you rely on the LCD screen alone.
It takes some serious experimenting to get the hang of when to use these lenses (and when not to). Optimal results will probably be produced through a combination of the lens shifting and post-capture adjustments.
Who’s it For?
Although the 55mm focal length is generally popular for its natural-looking perspective and many photographers will appreciate the relatively fast f/2.8 maximum aperture, tilt/shift lenses are highly specialised and definitely out of the scope of the everyday photographer. This lens is best suited to tabletop and product photography, especially with static subjects that can be positioned quite close to the camera.
It’s also more suitable for studio and indoor shooting than taking out on location. There are a few reasons for this – size, weight and complexity – but primarily it’s because any motion of elements within a scene could cause blurring if they shift out of the plane of focus.
Lenses like this have some creative potential, with one application being the restriction of the zone of focus within a scene to create a ‘miniature effect’ and another being to record a sequence of shots with the lens shifted and then stitch them together to encompass a wider area than you’d get with a straight shot.
Build and Ergonomics
The FFII TS 55mm f/2.8 lens is large and heavy for its focal length, mainly to accommodate the tilt/shift mechanism. It is solidly built with a high percentage of metal in its construction and the tilt and shift adjustments are integrated snugly into the lens barrel to enable precise adjustments to all lens movements.
Both lenses are virtually identical in construction, with shallow, permanently attached lens hoods. The supplied lens cap fits inside the built-in hood and is held in place by two pinch clips.
The flat front element has a diameter of roughly 60 mm. It sits within a roughly 10 mm wide annulus that carries the 77 mm diameter threading for screw-in filters.
Immediately behind the lens hood is a narrow blue branding ring, followed by a fixed, 8 mm wide section of the barrel that ends with the 50 mm wide focusing ring. This ring has a 302 mm wide strip of fine ribbing close to its leading edge to provide a grip surface, followed by an 18 mm wide section that carries the settings for the depth-of-field gauge. The aperture ring sits just behind.
It’s approximately 8 mm wide with engraved marks at the following aperture settings: f/2.8, f/4, f/5.6, f/8, f/11, f/16 and f/22. There are click stops between some of these settings, although they’re soft and it can be difficult to estimate which interim aperture you’ve selected. Not helping the matter is the fact that the EXIF metadata is not shared between the lens and the camera so, when you check your files subsequent to a shoot you have no idea of what aperture was set – unless you’ve taken notes.
Immediately behind the aperture ring is the tilt adjustment ring, which is about 9 mm wide and labelled at 30 degree increments between 30 and 90 degrees on either side of the zero mark. White lines in between these labels indicate the halfway points between them and the ring line up against another (slightly smaller) white line on the 3 mm wide section of the lens barrel just in front of the shift adjustment box.
The removable tripod foot is attached with two relatively large, slotted head screws to this ring and sits on a raised mount. Just above this mount is the release knob for locking and unlocking the ring.
The shift adjustment box comes in two sections and is just over 60 mm wide, with the front section occupying roughly 26 mm of this length. This section is attached to the lens barrel and has an arc cut out of it to accommodate the movable section behind it that controls side-to-side shift. A large black knob on the rear section controls the shift adjustments which can be set with the linear gauge on the front section, while a smaller knob on its base locks it into place.

The adjustment buttons for the separate rotation systems that enable the lens barrel to be set at different angles. (Source: Venus Optics.)
The rear section of the box is devoted to up/down movements and controlled by laterally-positioned knobs. White line gauges are on each side of the box to allow users to set precise positions, while a release button at the top left side provides a quick lock/unlock for these movements.
The lens barrel extends a further 11 mm, ending in a solid metal mounting plate, which fits securely to the camera. There appears to be no rubber gasket to keep out moisture and dust; but this is not the kind of lens you would use outdoors in adverse conditions.
Performance
Our Imatest tests showed the lens was capable of meeting expectations for the Sony α7 II’s 24-megapixel sensor with measurements taken in the centre of the image field for both JPEG and ARW.RAW files, although only when stopped down to f/6.3 or smaller. Interestingly, raw files taken at the same time delivered much higher resolution than the JPEGs, which we can’t explain.
Overall softening was found at the widest aperture settings, with centre resolution starting to improve at around f/4. The graph below shows the results of our tests on JPEG files across the aperture range.

Lateral chromatic aberration sat comfortably within the ‘low’ range for both JPEG and raw files and their test results were vey similar. The graph below shows the JPEG results, with the red line marking the lower edge of the low band and the purple line the upper edge.

Vignetting was effectively negligible and, given the nature of the lens, we didn’t bother to assess rectilinear distortion. Bokeh in close-up shots should be very smooth, given the 15-bladed iris diaphragm in the lens. It is also influenced by the selected lens aperture, which movements have been applied and also the background lighting so it’s largely under the photographer’s control.
Conclusion
Login or Register to access the Conclusion.
SPECS
Picture angle: 62.7 degrees diagonal
Minimum aperture: f/22
Lens construction:14 elements in 11 groups (including elements) coatings
Lens mounts: Sony E, Nikon Z, Canon RF, L Mount, GFX, XCD
Diaphragm Blades: 15 (circular aperture)
Tilt and Shift parameters: +/- 10 degrees tilt; +/- 12 mm shift
Weather resistance: Not specified
Focus drive: Manual focus
Stabilisation: No
Minimum focus: 27 cm
Maximum magnification: 1x
Filter size: 77 mm
Dimensions (Diameter x L): 85 x 168.5 mm
Weight: 1345 grams
Standard Accessories: Front and rear caps,
Distributor: Laowa Lenses Australia
TESTS
Based upon JPEG files taken with the Sony α7 II camera.


Based on ARW.RAW files recorded simultaneously and converted into 16-bit TIFF format with Adobe Camera Raw.


SAMPLES
Below: Angled subject showing how the plane of focus can be shifted by tilting the lens. The lens aperture was set to f/5.6.

Focus on the nearest edge of the subject.

Focus across the middle of the subject.
Focus on the title at the far end of the subject.

Stopping the lens down to f/16 and focusing on the middle of the book produced an image with a relatively wide depth of focus.

Perspective corrections made using the lens tilt and shift.

Replication of the Miniature Effect. © Kiva Huang (Source: Venus Optics.)

Close-up shot of a relatively flat product at an angle to the camera using a f/11 aperture.

Macro close-up at f/4 with focus upon the figure on the left side of the frame.

Macro close-up at f/5.6 with focus on the centre of the frame.

Panorama shot using the lens shift function. © John Hanson. (Source: Venus Optics.)
Rating
RRP: US$1249 (approximately AU$1960 at time of publication)
- Build: 9.0
- Handling: 8.6
- Image quality: 8.6
- Focusing: 8.8
- Versatility: 8.5
BUY