Zoner Studio’s new AI tools allow you to complete complex photo editing tasks quickly and easily. [Article courtesy of Zoner Studio]
New AI tools in the latest Zoner Studio update make it quicker and easier to select the main subject of your photo, whether it’s a person, pet, product or something else. These tools are located in the Develop module; you can find them in the right panel. The options available include Subject, Background, Sky and Object, all of which are AI-based. The toolbar also contains icons for accessing manual Brush, Radial Gradient, Linear Gradient, Colour Range and Luminance Range adjustments, which can be used to fine-tune your selections.
All of these tools create masks, which can be used to adjust specific areas in an image. In addition, you can combine several of them within a single mask to provide a wider range of editing options that will help you to carry out complex tasks quickly and easily.
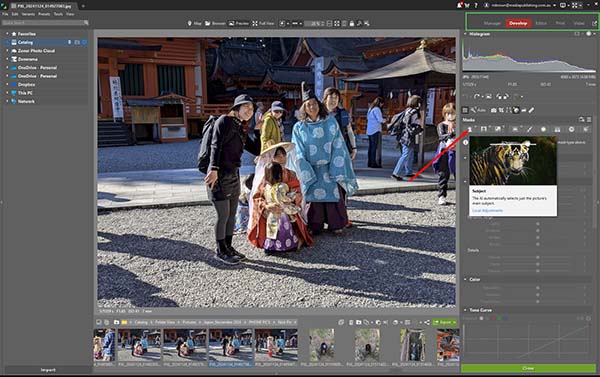
Shows the starting point for Subject selection, with the Develop module highlighted in red in the top panel and the AI Subject masking icon indicated by a red arrow. (The image is one that has caused problems for other software applications.)
We experimented with using Zoner Studio’s AI Subject masking tools on a range of images from a few with easy-to-define subjects through to those for which accurate separation of the subject from the background would be challenging.
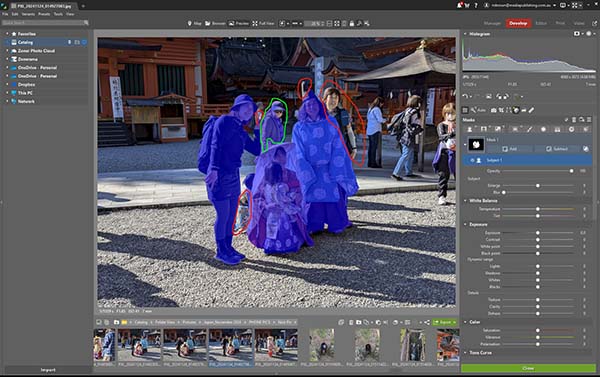
The initial AI-based selection of the subject in an image which had clocked up mostly failures when tested with other applications. The areas enclosed in red show parts of the subject missed by the selection process, while the area encircled in green shows an unwanted inclusion in the selection.
One factor that puts Zoner Studio ahead of most competitors is the ease with which users can fine-tune the AI selections non-destructively. The Mask bar provides Add and Subtract dropdown menus with tools for refining selections.
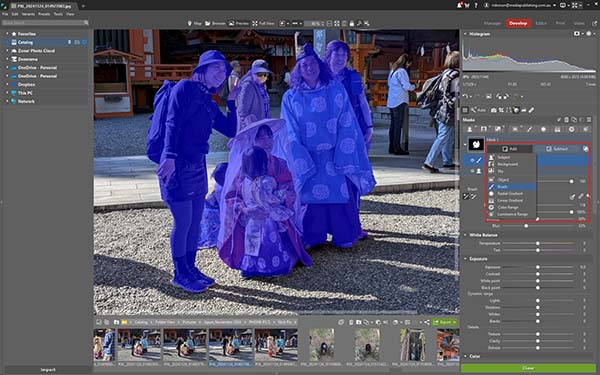
Shows the Brush tool (highlighted in blue) in use for adding the missing areas to the mask. Users can adjust the diameter of the brush point, the Opacity (strength) and Density with which it is applied and the Blurring of its edges. Only the tip of the man’s hat remains to be added to the mask in this screen grab.
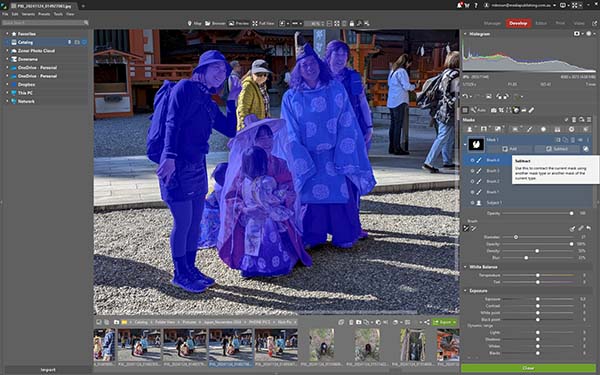
The brush tool has been used to Subtract the unwanted person in the background from the group. Note the accumulation of multiple masks – each of them fully customisable with the additional tools provided in the panel – as each new action is added.
Further adjustments can be made via the pop-up Presets panel, which provides quick access to a wide variety of filters, adjustment tools and local adjustments.
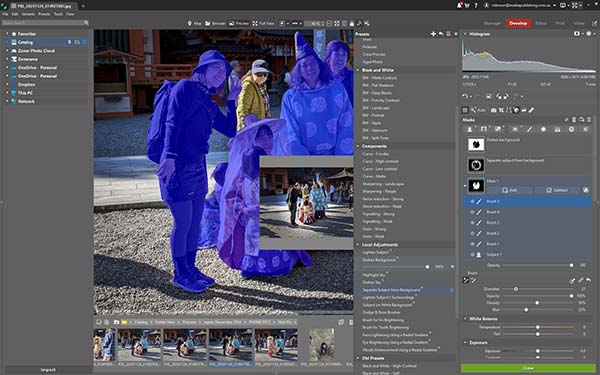
Zoner Studio provides a wide variety of adjustment presets to allow users to carry out further fine-tuning of images.
When you’re happy with the look of the selected subject, you can move to the Editor module to apply further changes with the regular global tools in the application. Note that all adjustments made in the Develop module are stored as you make them in a separate ‘sidecar’ file that leaves the original image untouched. This lets you go back later to make further adjustments, including after closing and reopening the program.
If you try to save the image in the Editor module, the software will post a warning that you need to save the image by creating a new file with the applied edits, as shown in the screen grab below.
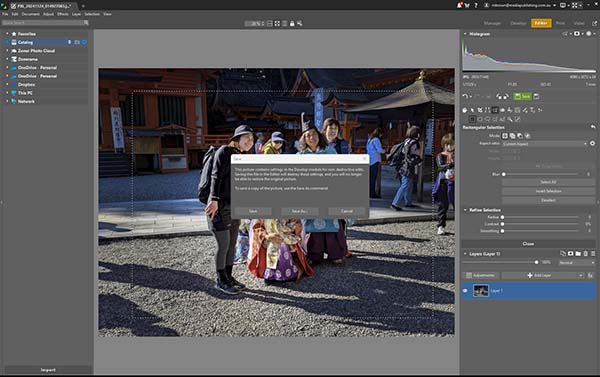
Shows the warning that pops-up if you attempt to save an edited image without first creating a new file in one of the many file formats the program supports.
Try Zoner Studio 7 days for free – click here