

In summary
The main advantages of DxO PureRAW5 come from its ability to draw upon the data stored in DxO’s Optics Modules. This catalogue is regularly updated to include the latest cameras and lenses and it is included in DxO PureRAW, DxO PhotoLab, DxO FilmPack and DxO ViewPoint.
Each time an image is opened in DxO PureRAW, DxO PhotoLab, DxO FilmPack, or DxO ViewPoint, the software will use built-in EXIF data to identify the design and model of the lens and camera and the settings used to capture the image. By applying the algorithms developed specifically for the lens and camera pair in DxO’s laboratories, corrections can be applied to address the equipment’s inherent defects with respect to optical vignetting, geometric distortion, lateral chromatic aberration and perceptual blurring.
This means DxO PureRAW5 should, therefore, be seen as a preliminary processor. All subsequent adjustments will be done in your regular image editor.
Full review
The latest version of DxO Labs’ raw processing plug-in represents a significant update to its predecessor, PureRAW 4, while retaining the best features of previous versions of the software. This application has been developed to utilise the company’s extensive data set of thousands of camera/lens combinations for correcting lens distortions and optical aberrations as well as issues associated with noise, sharpness and the demosaicing process used to create coloured images from camera sensors. The last couple of editions have introduced AI-based denoising and demosaicing capabilities and support for batch processing. Now, PureRAW5 promises a cleaner interface, improved noise reduction, more control over adjustments and new tools for processing raw files from cameras with Fujifilm’s X-Trans sensors.
The image used to promote DxO PureRAW5. (Source: DxO Labs.)
PureRaw 5 was pre-announced at CP+ on 27 February so some of the latest enhancements are not unexpected. Photo Review was given an opportunity to explore the new features in the latest version of the software towards the end of the beta testing period. This report will highlight some of the key changes features in the latest version.
Who’s it For?
As with previous versions, the main target audience for PureRAW5 is professional photographers and serious photo enthusiasts who regularly shoot raw files and edit them in commonly-used software applications like Adobe’s Photoshop and Lightroom. However, because edited files from PureRAW5 are output as DNG raw files (the ‘universal’ raw file format), TIFF files or JPEGs, they will be compatible with any editing application that can handle raw files.
The main advantages provided by this application come from its ability to draw upon the data stored in DxO’s Optics Modules. This catalogue is regularly updated to include the latest cameras and lenses and it is included in DxO PureRAW, DxO PhotoLab, DxO FilmPack and DxO ViewPoint.
Each time an image is opened in DxO PureRAW, DxO PhotoLab, DxO FilmPack, or DxO ViewPoint, the software will use built-in EXIF data to identify the design and model of the lens and camera and the settings used to capture the image. By applying the algorithms developed specifically for the lens and camera pair in DxO’s laboratories, corrections can be applied to address the equipment’s inherent defects with respect to optical vignetting, geometric distortion, lateral chromatic aberration and perceptual blurring.
This means DxO PureRAW5 should, therefore, be seen as a preliminary processor. All subsequent adjustments will be done in your regular image editor.
Unchanged Features
Some features of the software are largely unchanged, notably the Lightbox screen, which is used to add the images you want to process as well as for selecting individual files to work on.
The Lightbox screen presents the initial entrance to DxO PureRAW. This is where you add, select and, when required, remove selected files. It is divided into four sections:
- The Menu bar, which carries the DxO PureRAW, DxO Optics Modules, and Help (on Mac), or File, DxO Optics Modules and Help (on PC).
- The Upper toolbar with icons that let you add, remove, select, select all, or empty the Lightbox of photos, as well as sort and filter your images.
- The Image thumbnail display area, which shows uploaded files, sorted by date of capture. When the area is empty of thumbnails, it displays the options for adding files to process (via a system window, or by dragging and dropping into the window) as well as an option to download sample RAW images.
- The Lower toolbar: lets you start image processing and displays the image processing progress bar.
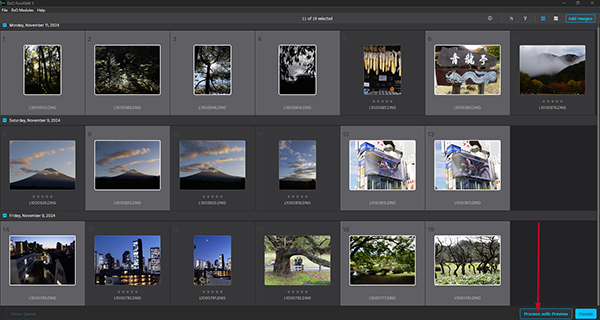
The Lightbox selection screen is largely unchanged from the previous version of the software. Clicking on the Process with Preview button (Indicated with the red arrow) opens the selected image(s) one-by-one in the Preview screen.
The Viewer displays a selected image in a main workspace that lets you check the optimisation results and gives you several options for comparing the adjusted image with the original. The filmstrip below the main workspace can be hidden, if desired, while the bar below it provides two processing options: Add to Queue for files you intend to batch process or Process Now.
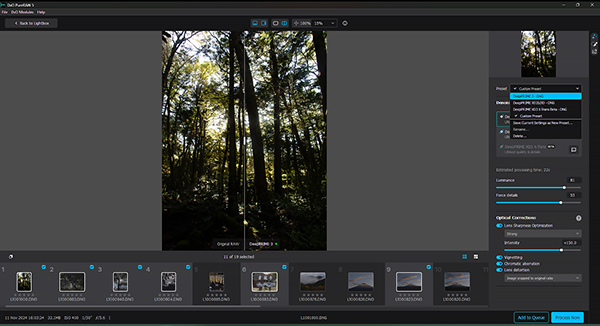
The Viewer remains the main workspace where raw image files are uploaded for processing. It can be customised to provide the viewing options you require by selecting from the icons above the main workspace.
The Process with Preview screen is an alternative view where you can make the initial processing adjustments and also call up the image metadata. By default, the screen provides a split view that lets you compare the original image (indicated with the red arrow in the screen grab below) with one to which DeepPRIME 3 processing adjustments have been made automatically (shown with the yellow arrow), based upon ‘AI’ processing (see below).
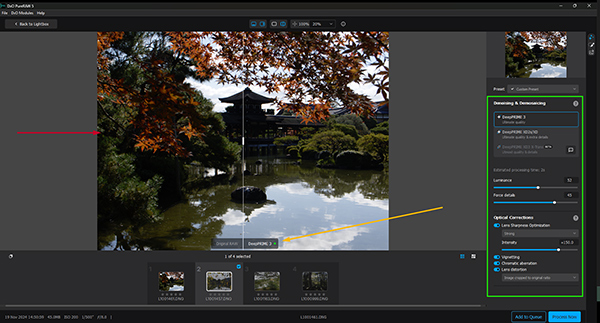
The Process with Preview screen. The red arrow shows the split image display with the yellow arrow pointing to the mode identifiers. The adjustments panel is outlined in green on this screen grab.
Further adjustments can be made with the sliders in the adjustments panel. Unfortunately, only two sliders are provided and you can’t see what effects they have while you’re making adjustments – only after you’ve processed the image. This makes adjusting brightness and contrast very hit-or-miss.
The strip of thumbnails below the working space shows the images that have been uploaded to the Lightbox. One of the changes introduced since the previous version has been to shift the display controls from the lower toolbar to a bar just above the workspace.
You can show or hide the filmstrip by clicking on the left side icon in this toolbar. The icon to its right lets you show or hide the processing settings display, while the next icon along lets you swap between the split screen and whole image views.
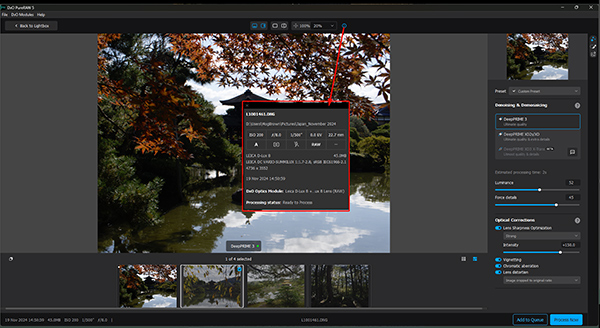
The image data display.
To the right of these icons is a box that provides magnification settings for viewing the displayed image while a circled ‘i’ button brings up a screen showing the original image data. At the left-hand end of the bar is a button to click on when you want to return to the Lightbox.
The magnification settings come in jumps of 100% or more -and there are no settings smaller than 100%. If you want to zoom in and out on the image, it’s easier to do it with the scroll wheel on your mouse, which also provides much greater precision.
New Features
PureRaw 5 introduces a range of new features:
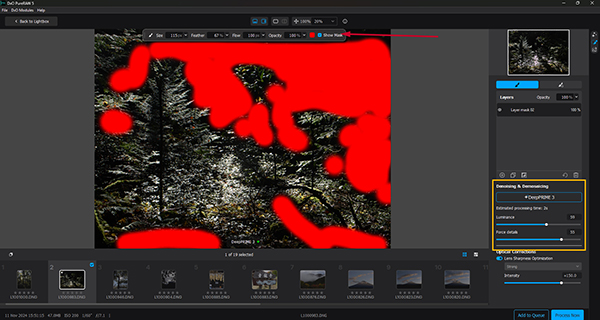
1. Local adjustments
This new feature allows users to create a series of masks to fine-tune denoising and target sharpening more precisely. The illustration below shows the user interface with the masking toolbar at the top of the workspace indicated by an arrow and the adjustment sliders outlined in yellow in the lower right corner.
The local adjustments workspace, showing a mask applied to the darkest areas in the image.
Users can adjust the transparency of each mask to allow details below it to be revealed. They can also create multiple layers to masks to allow different adjustments to be applied to different parts of an image.
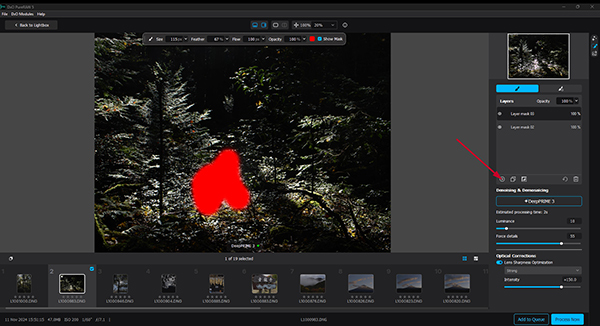
The red arrow points to the button you click to open additional masking layers.
2. DeepPRIME
The Deep Prime processing engine is now in its third generation, which adds a third process, correcting residual chromatic shifts at a pixel level, to the existing demosaicing and denoising, which have been based upon machine learning.
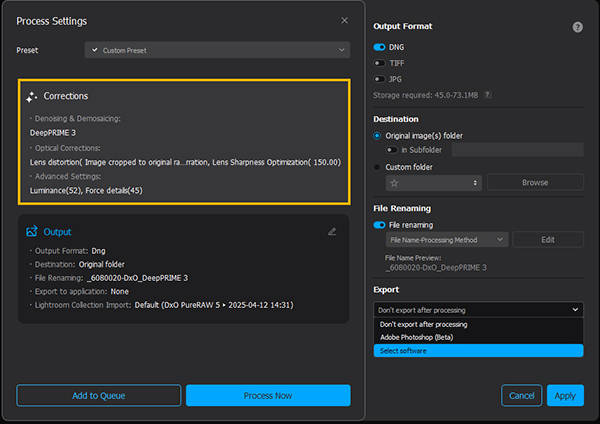
This screen grab provides a snapshot of the processing settings, with the original corrections shown in the area outlined in yellow and the remainder of the screen providing the various output options for the processed file.

The denoising options provided in the Denoising & Demosaicing toolbar.
3. Custom presets
Users can save custom presets based upon variables like specific camera and lens brands and models, ISO values used or different subject classifications. These can be used subsequently to enable faster and more targeted editing of different image types.
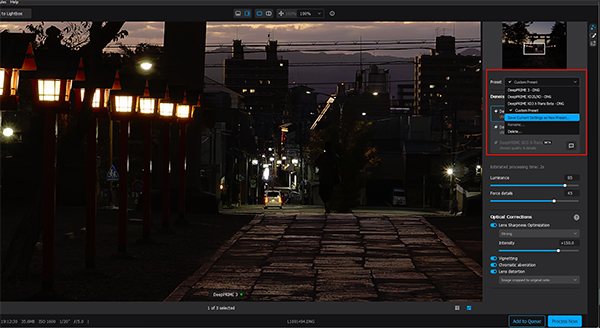
The Preset dropdown menu is outlined in red in this screen grab.
4. DeepPRIME XD3 X-Trans Beta
DxO PureRAW5 introduces a new additional function, DeepPRIME XD3 X-Trans Beta, which has been designed specifically for owners and users of Fujifilm cameras with X-Trans sensors and will allow them to access latest generation of noise reduction and detail extraction tools. It was not accessible when we received access to the Beta Licence so we haven’t been able to comment on it. However, we’re told the link will be active at the official launch on 15 April.
![]()
The DeepPRIME XD3 X-Trans Beta function was not available when we checked out the software.
Performance
Because we normally use Adobe Camera Raw as our standard raw file converter and edit images in Adobe Photoshop, we have evaluated DxO PureRAW5 on how well it performs as an adjunct to an image editor. Our main assessments have been on the basis of noise reduction, correction of optical errors due to inherent lens defects and enhancements to image sharpness, clarity and colour reproduction.
We have also compared the capabilities offered by DxO PureRAW5 with those found in Adobe Camera Raw and noted the relative advantages of each application.
Noise and Colour Comparisons: We based our assessments on a nine-year-old ORF.RAW file, recorded with an Olympus E-M1 camera, which has a 17.3 x 13.0 mm sensor and is, therefore more likely to be subject to image noise. The 30-second exposure used would have increased the potential for noise by adding long-exposure noise. The screen grab below compares the results of processing using crops taken from images magnified to 100% from the original raw frame when it was processed by Adobe Camera Raw (top image) and DxO PureRAW5 (below).
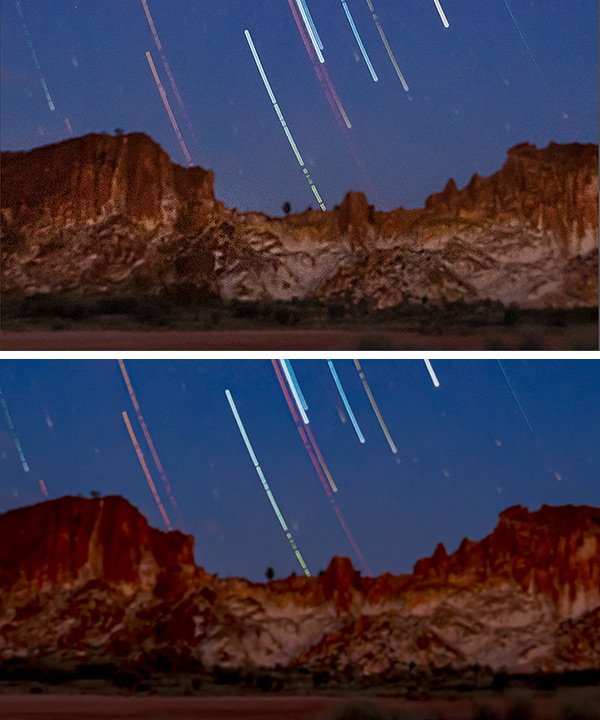
The file processed with DxO PureRAW5 (lower image) has a clear advantage when it comes to smoothing out image noise while retaining colour clarity and saturation.
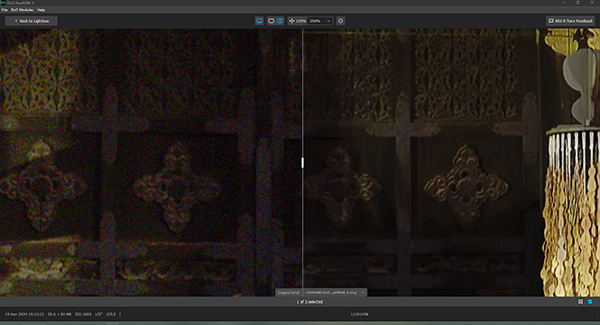
Similarly, another M4/3 raw file, this time from Leica D-lux 8, taken in November 2024, shows the noise differences in a low-light, low contrast image when magnified to 200% of actual size. Note the colour noise in the original file and its absence in the processed one, which is also sharper and has a better contrast ratio.
We also looked at the ability to correct lens distortions, using the same DNG.RAW file taken with the Leica D-lux 8 in November 2024.

These two images show the slight barrel distortion in the original DNG.RAW file (left) and the corrections applied by DeepPRIME 3 on the right.
Our main gripe with DxO Pure Raw (all versions so far) lies with its user interface; specifically, the dearth of user-controllable adjustments provided and the lack of support for live previews showing the degree of adjustments the user makes. Unfortunately, this is the software’s main weakness, when compared with Adobe Camera Raw, as shown in the screen grabs below.
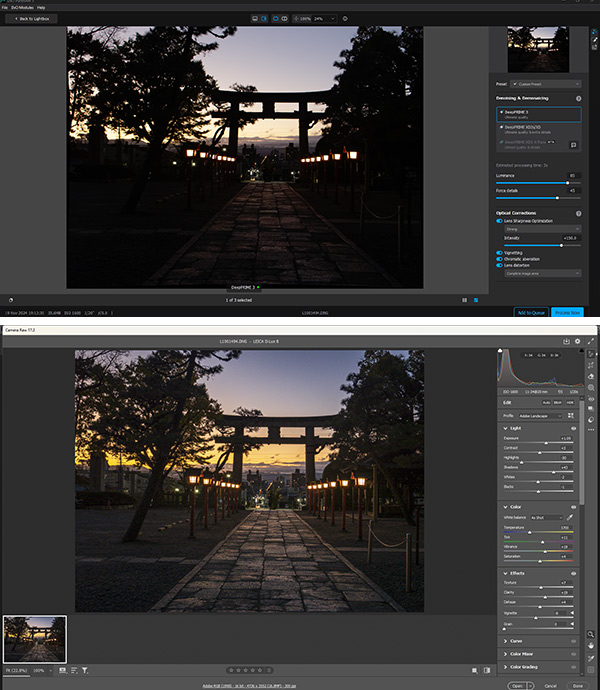
The user interface for DxO PureRAW5 is shown in the upper screen grab, while the user interface for Adobe Camera Raw is shown in the lower one. Basic adjustments have been applied in both cases.
When you can’t see the effects of adjustments in real time you have no way of knowing just how much to move the adjustment sliders until you’ve locked in an adjustment. If the settings you applied turn out to over-correct you must go back to the original file and start again unless the changes have been relatively minor. In that case, they should be correctable in your regular image editor.
Conclusion
Login or Register to access the full article.
SPECS
Hardware: Intel Core or AMD Ryzen with 4 cores plus Windows 10 (64-bit editions only) or macOS 14 (Sonoma) with any CPU
Display support: 1280 x 800 display resolution (or higher)
Disk space requirement: 4 GB of available hard disk space (software download is 6.46MB)
Minimum RAM: 8 GB RAM plus 6 GB available disk space
Graphics support (recommended): Windows – NVIDIA RTX 2080 or AMD Radeon RX 6700 with latest drivers plus 8GB of VRAM; macOS – M1 or Intel Mac with AMD Radeon Pro RX5700
Computer interface: Internet connection and registration are necessary to download 187MB file and for software activation and access to online services; the software can be activated on up to 2 computers
Batch processing: Yes
Distributor: DxO Labs
Rating
RRP: US$119.99 for new licence; US$79.99 to upgrade from previous version
- Features: 9.0
- Ease of Use: 8.9
- Versatility: 8.6